
You can integrate Greenhouse with Process Street Process Street’s Automations.
Greenhouse enables you to not only find and hire the right candidates but also manage the candidate pipeline from start to end. However, you can supercharge your use of Greenhouse by integrating it with Process Street to automate your hiring and onboarding process.
Users: In order to create this integration, you must be an Administrator or a Full Member in Process Street and have “Can manage and configure webhooks” permission in Greenhouse.
It’s important to follow these steps in order to enable a successful connection between Process Street and Greenhouse.
Also please note that you should not try to set this up concurrently in Process Street and Greenhouse, as your connection will not work correctly, take it one step at a time 😉
Let’s look at how you can do this.
First, create a Workflow in Process Street and ensure to add form fields that are the same as your data fields in Greenhouse. This will help you to map the relevant information from Greenhouse to Process Street.
In this example, we are triggering the Employee Onboarding workflow to run when a new candidate is hired through Greenhouse.
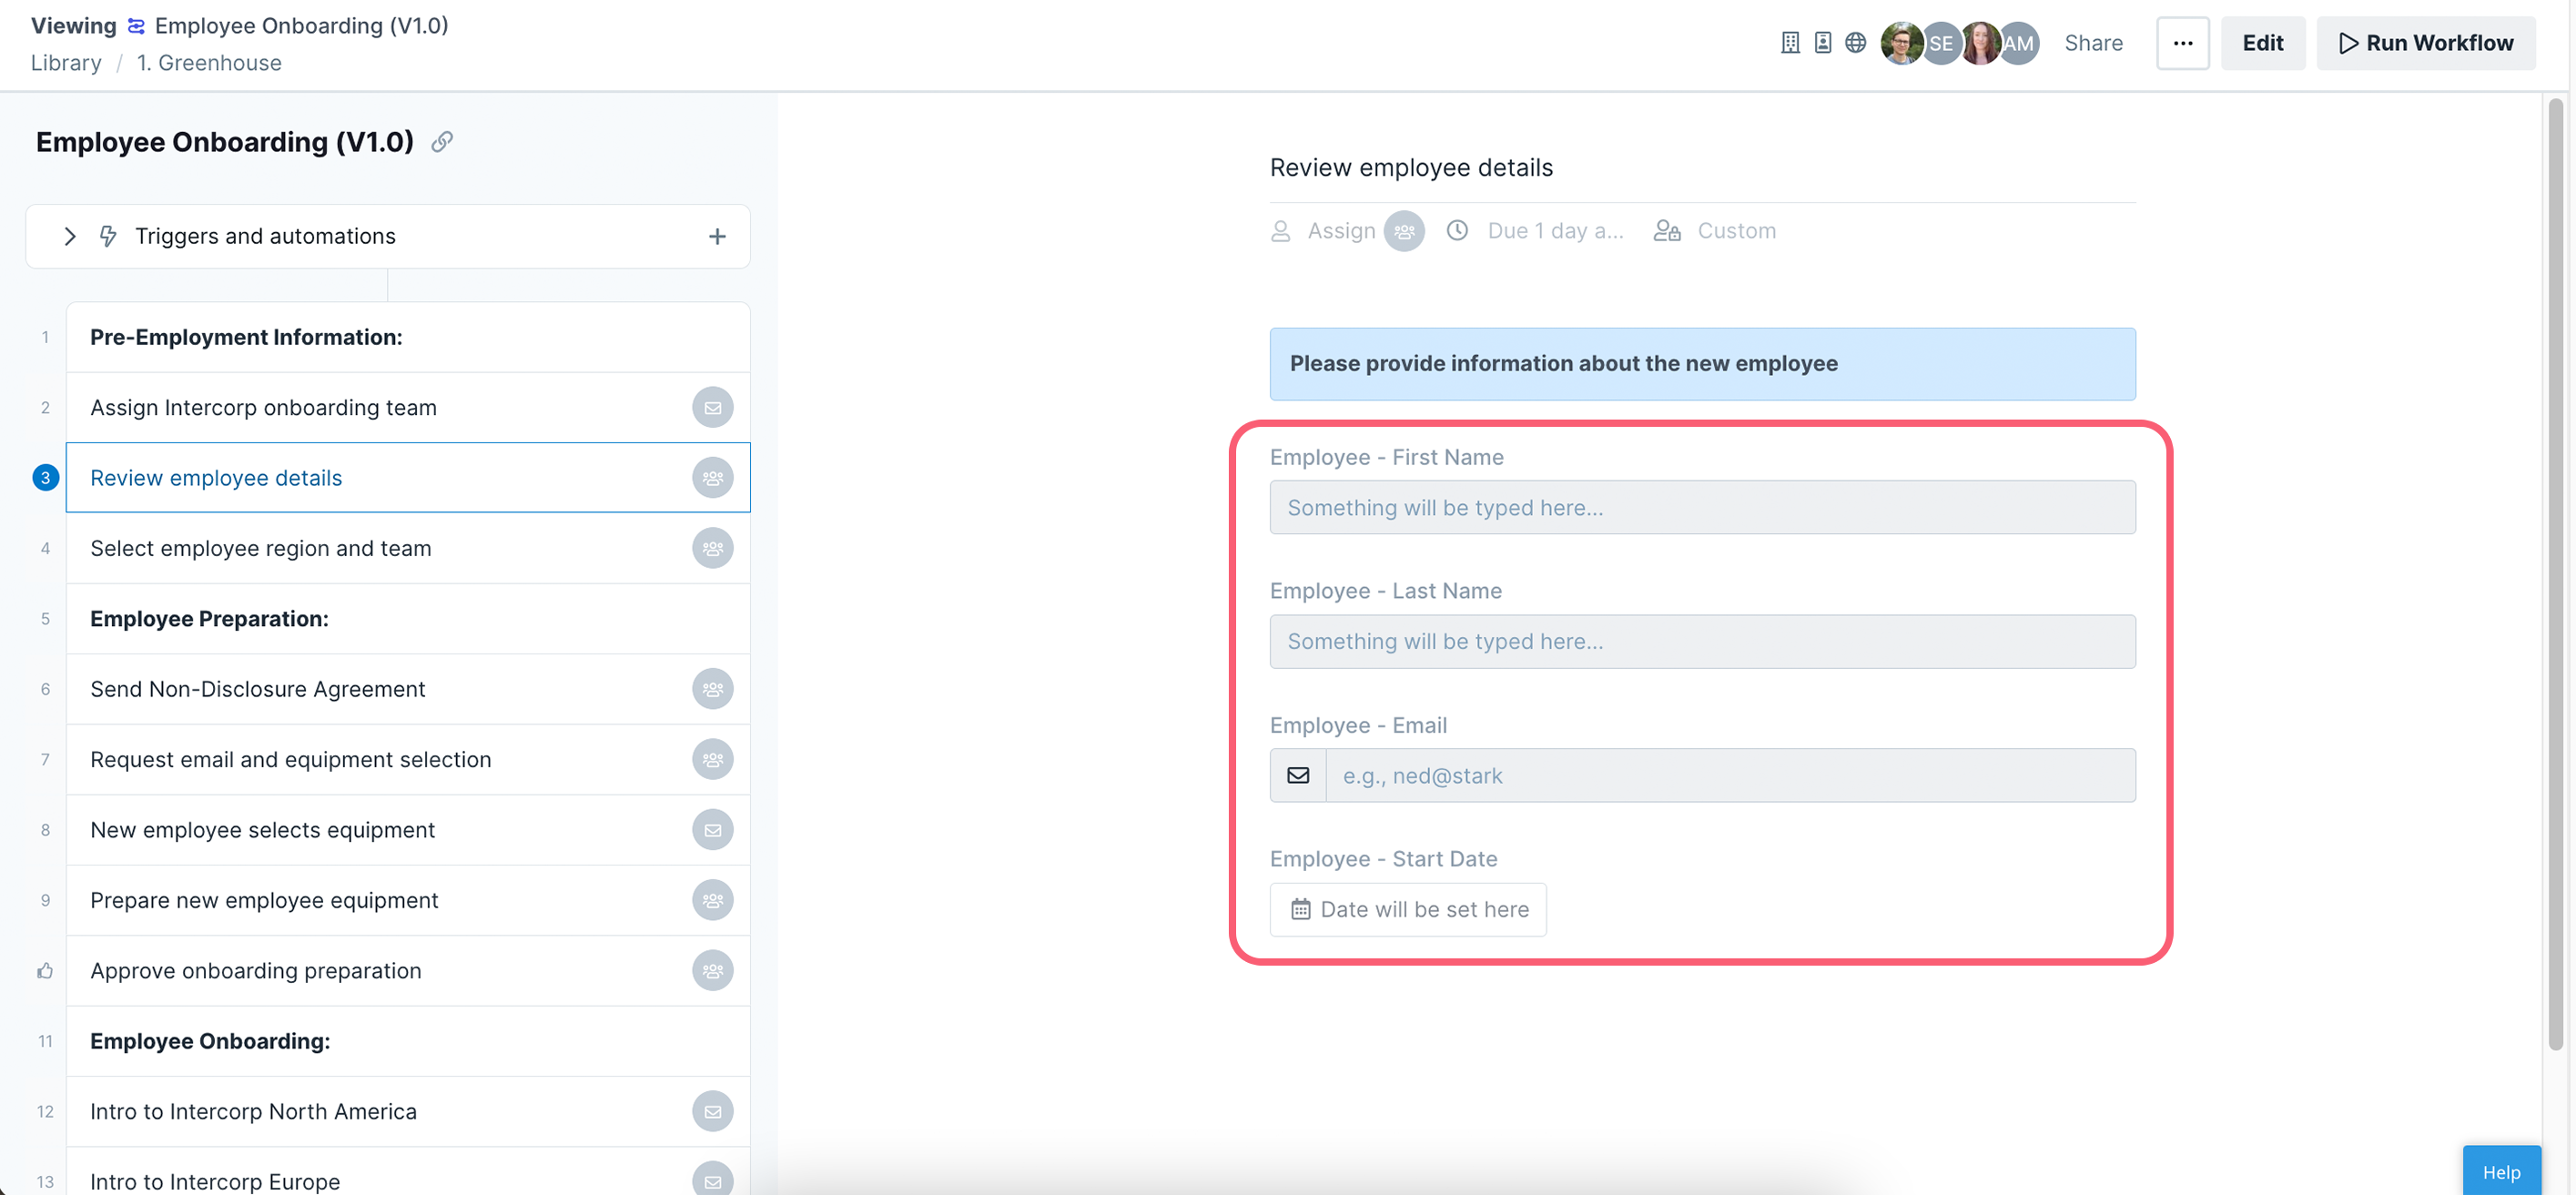
Their information is stored in Greenhouse via a form that the candidate has filled in while applying for the job. So, we need to create relevant form fields in our workflow to push that information through to Process Street. These form fields should include the candidate’s first and last names (short text fields), email addresses (email field), phone numbers (number field), and so on.
This will mean that whoever is onboarding the candidate won’t have to look up their information in Greenhouse, but can instead see everything in Process Street.
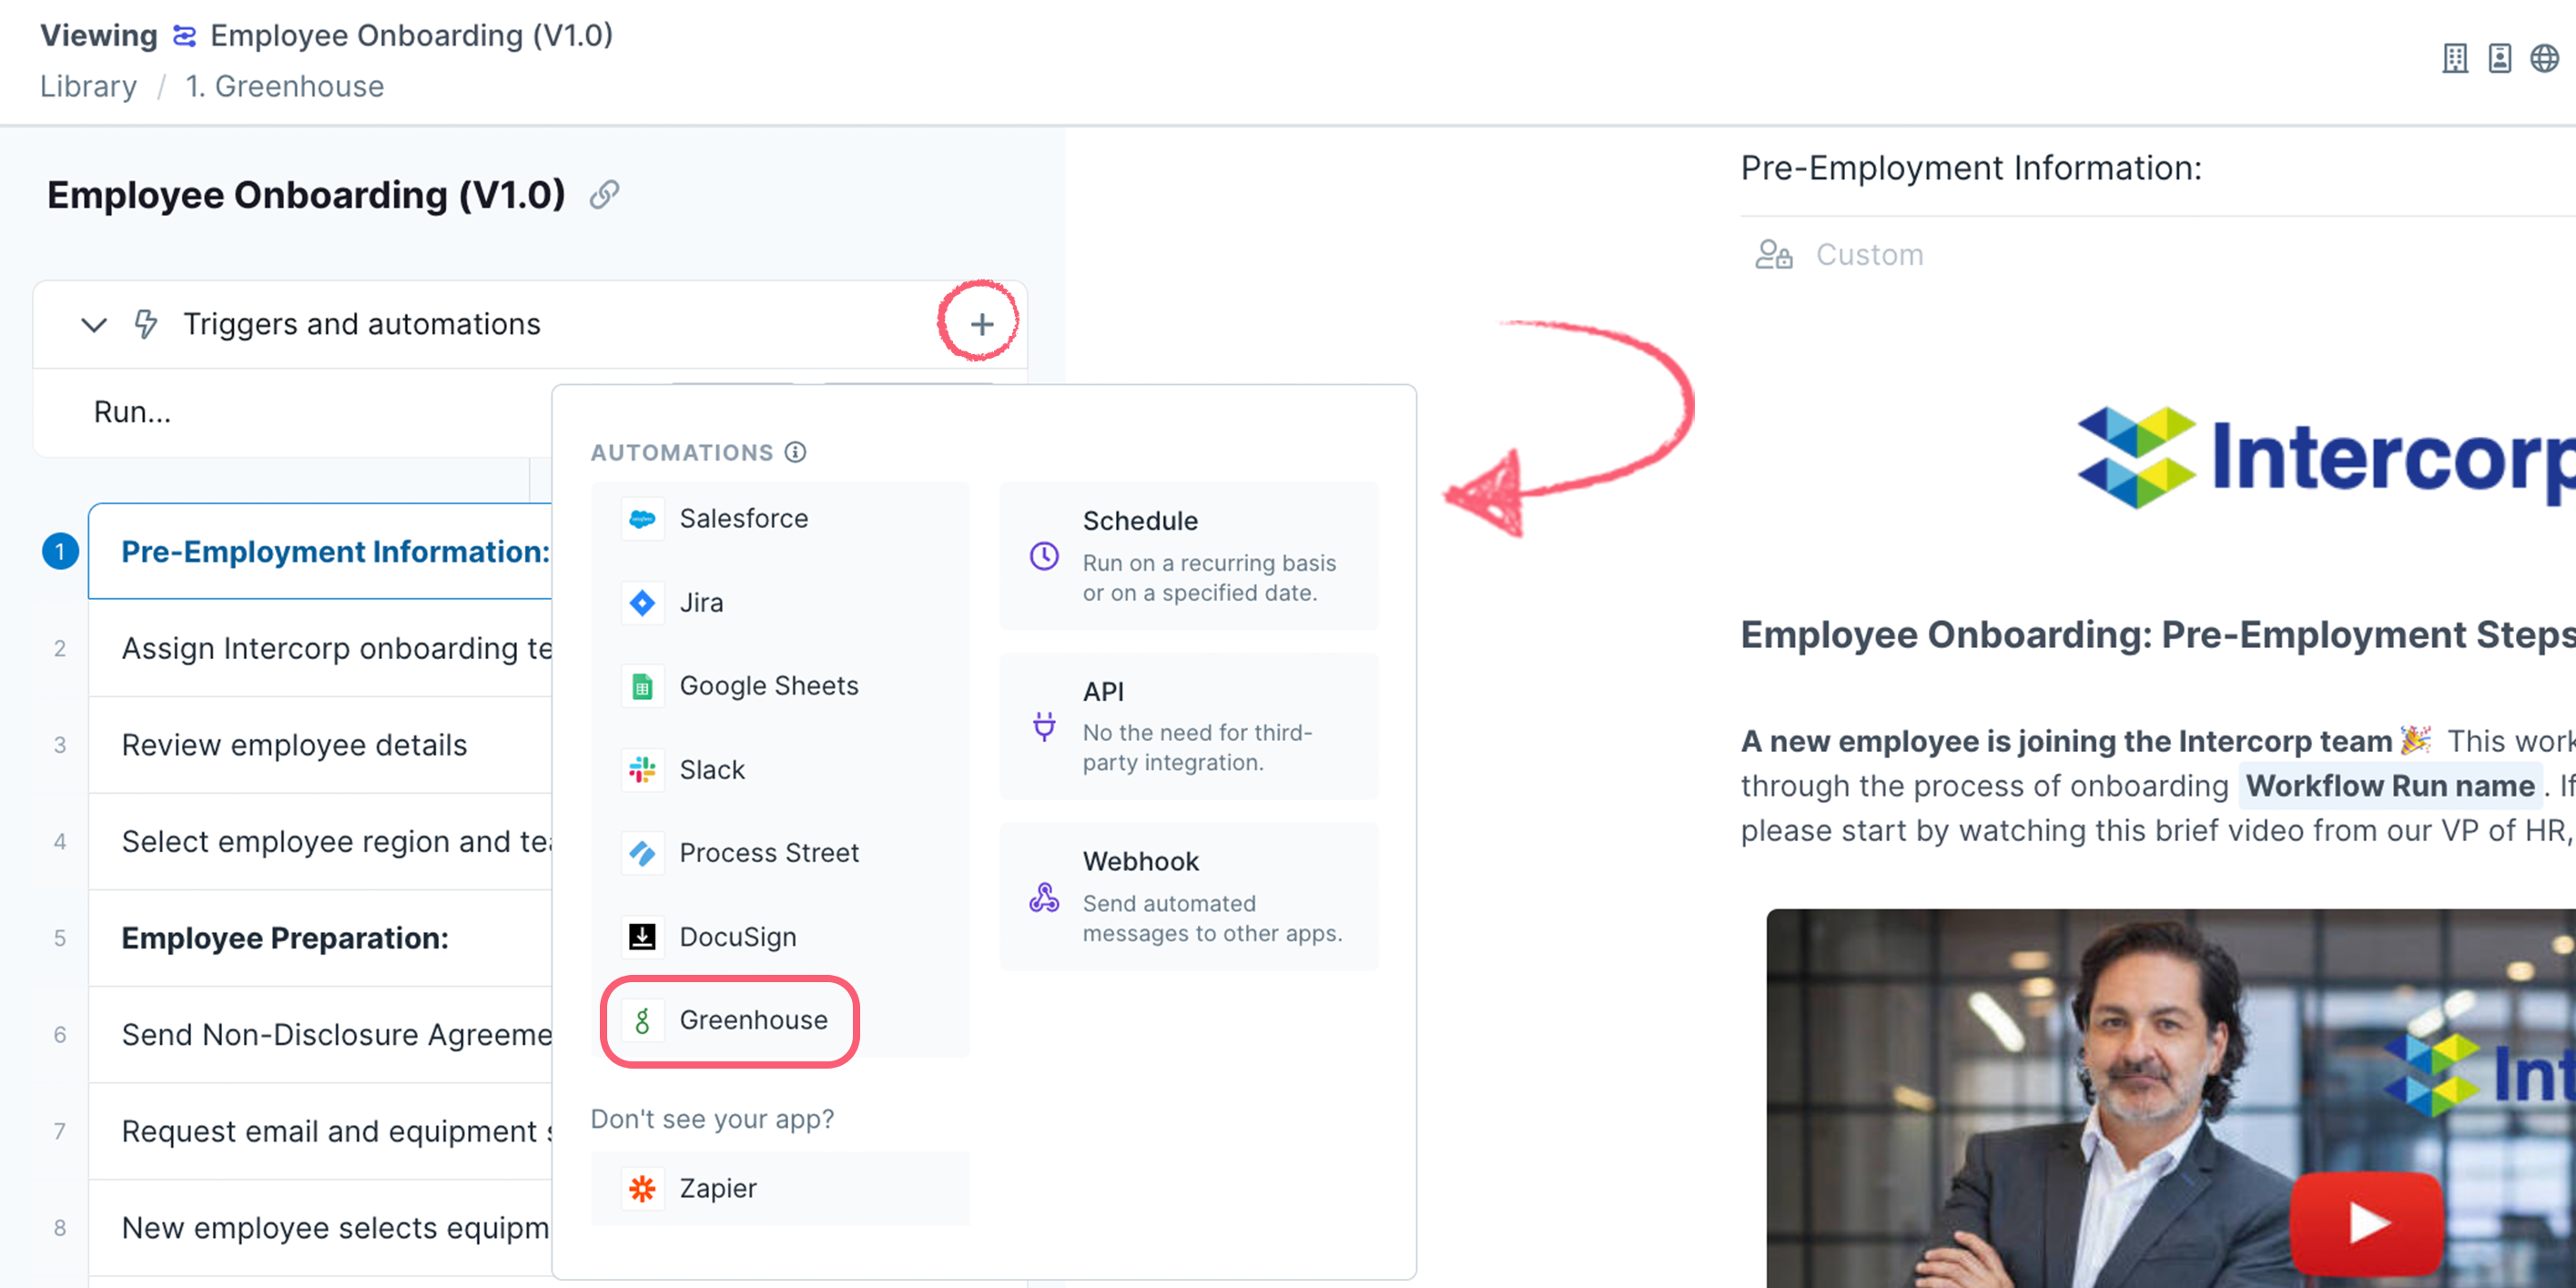
When viewing your workflow, click the + button to open up the automations modal. Select Greenhouse, as shown below.
Next, select Run a workflow when as your trigger, select Greenhouse and you’ll see the action is automatically set to … a candidate is hired.
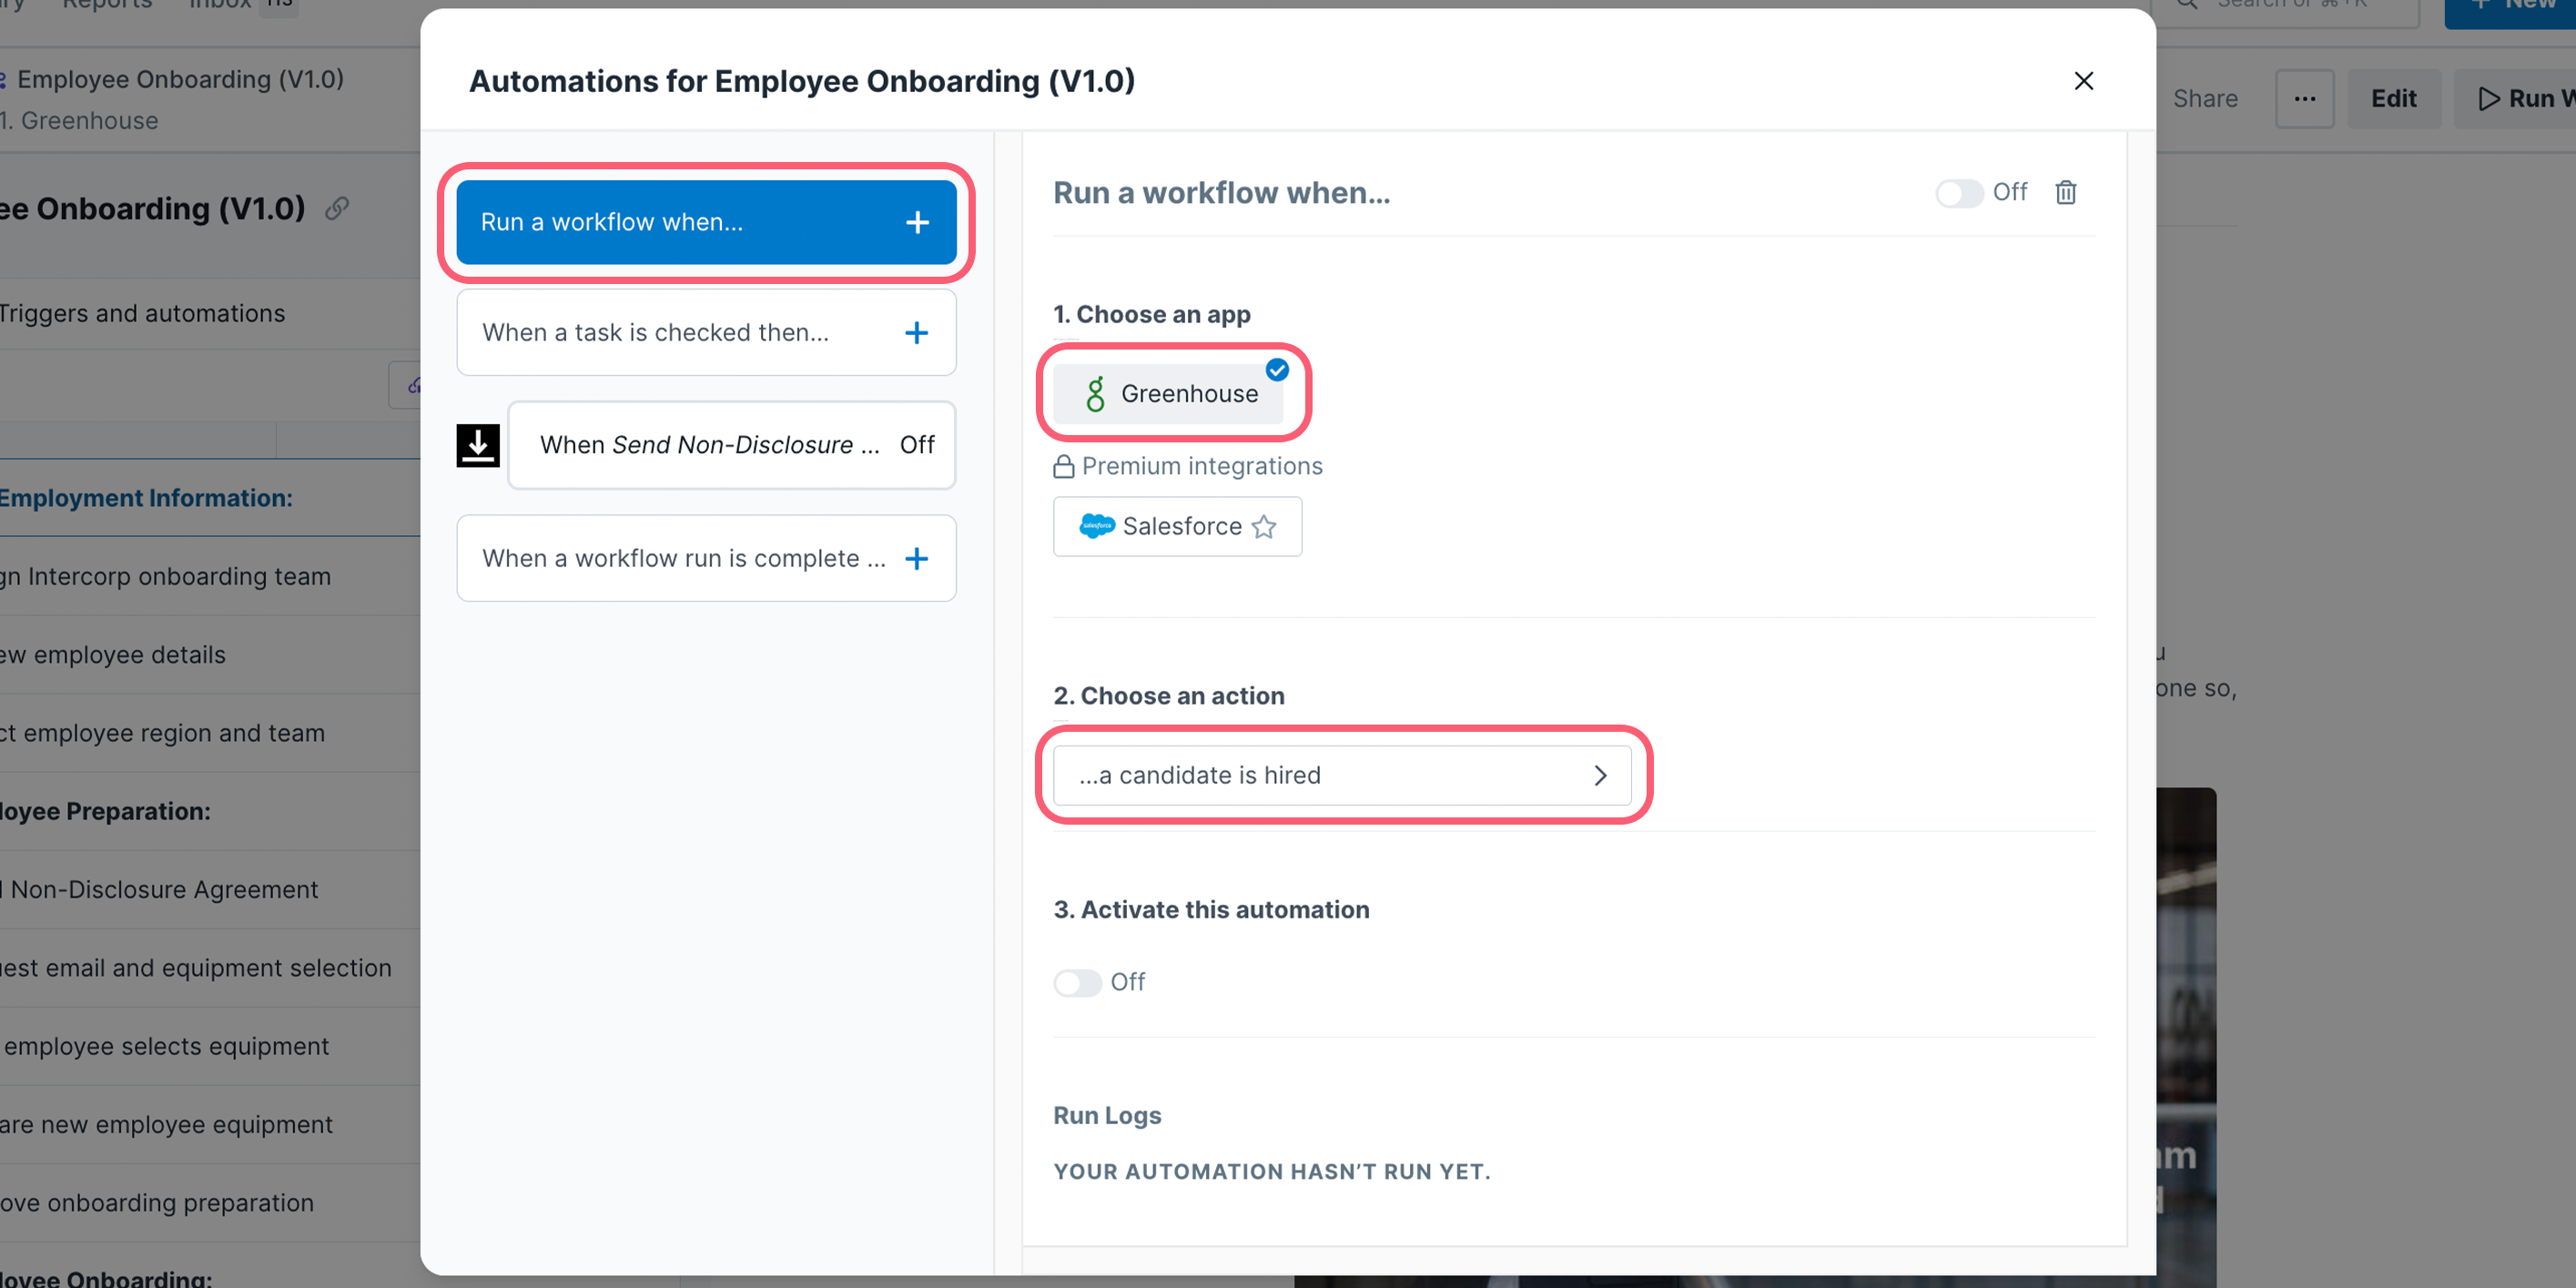
Click the candidate is hired field to continue in the automation setup wizard.
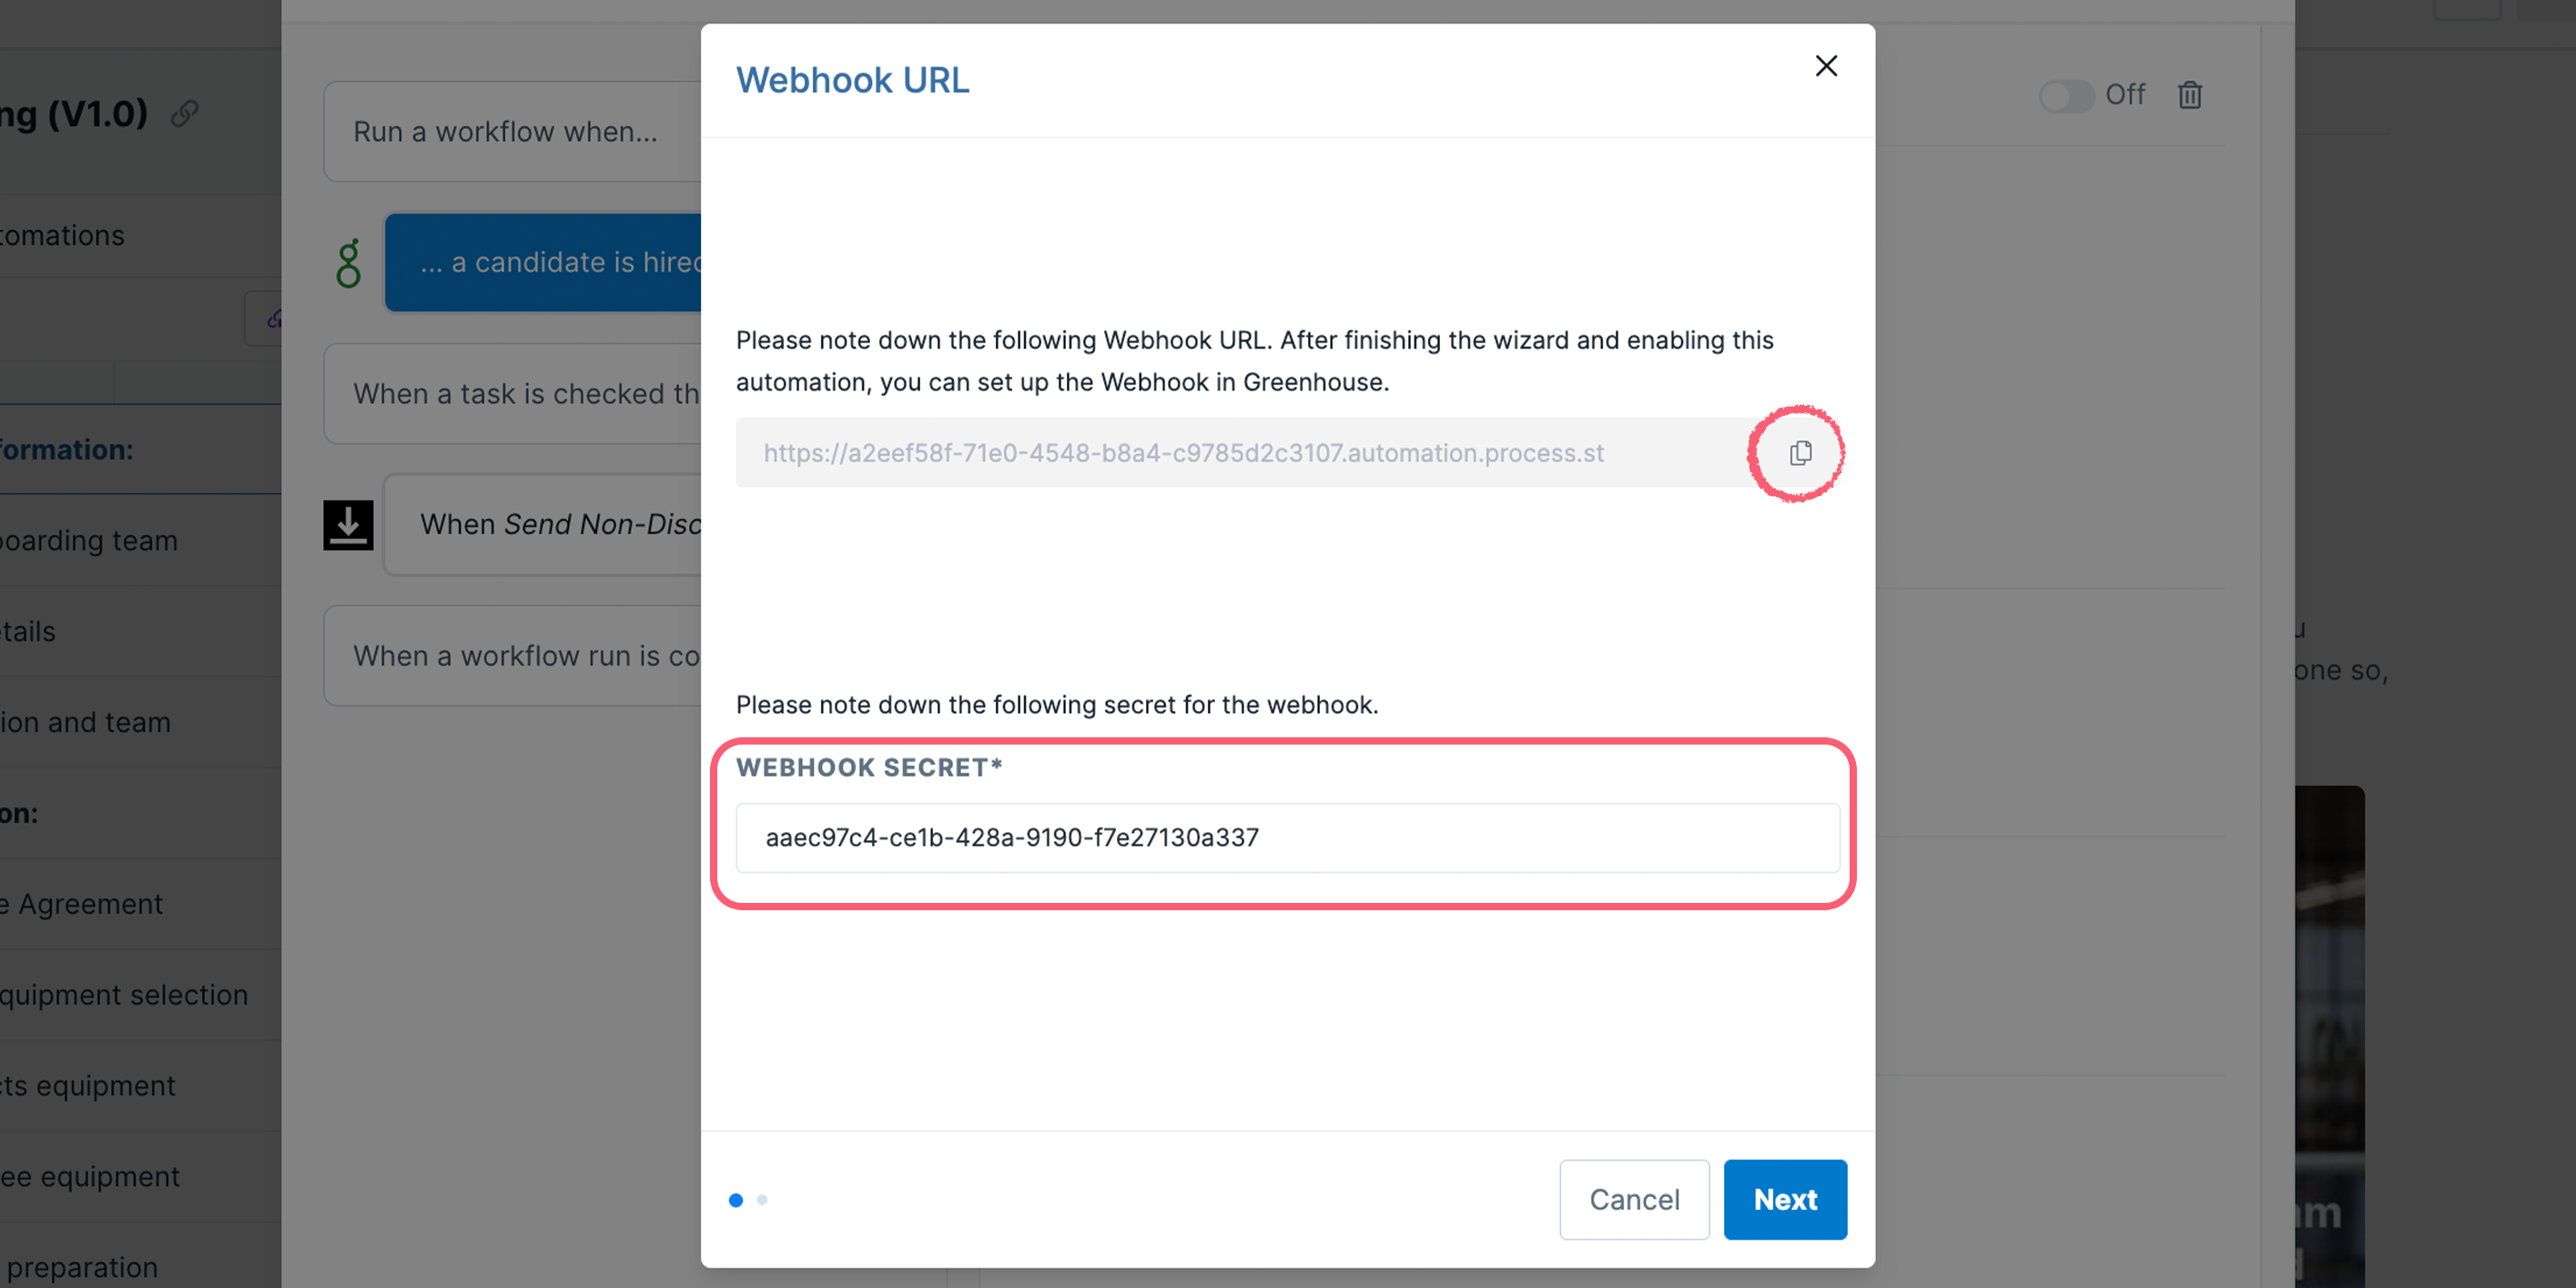
Copy/paste the URL and webhook secret into a separate note, or doc file as you’ll need them when you go to set up your webhook in Greenhouse. Don’t add them to Greenhouse just yet as your connection won’t be set up correctly! Finish setting up your Process Street automation before opening Greenhouse.
Click Next, and map the fields from your Greenhouse candidate record to the form fields you’d like to populate in your Process Street workflow run.
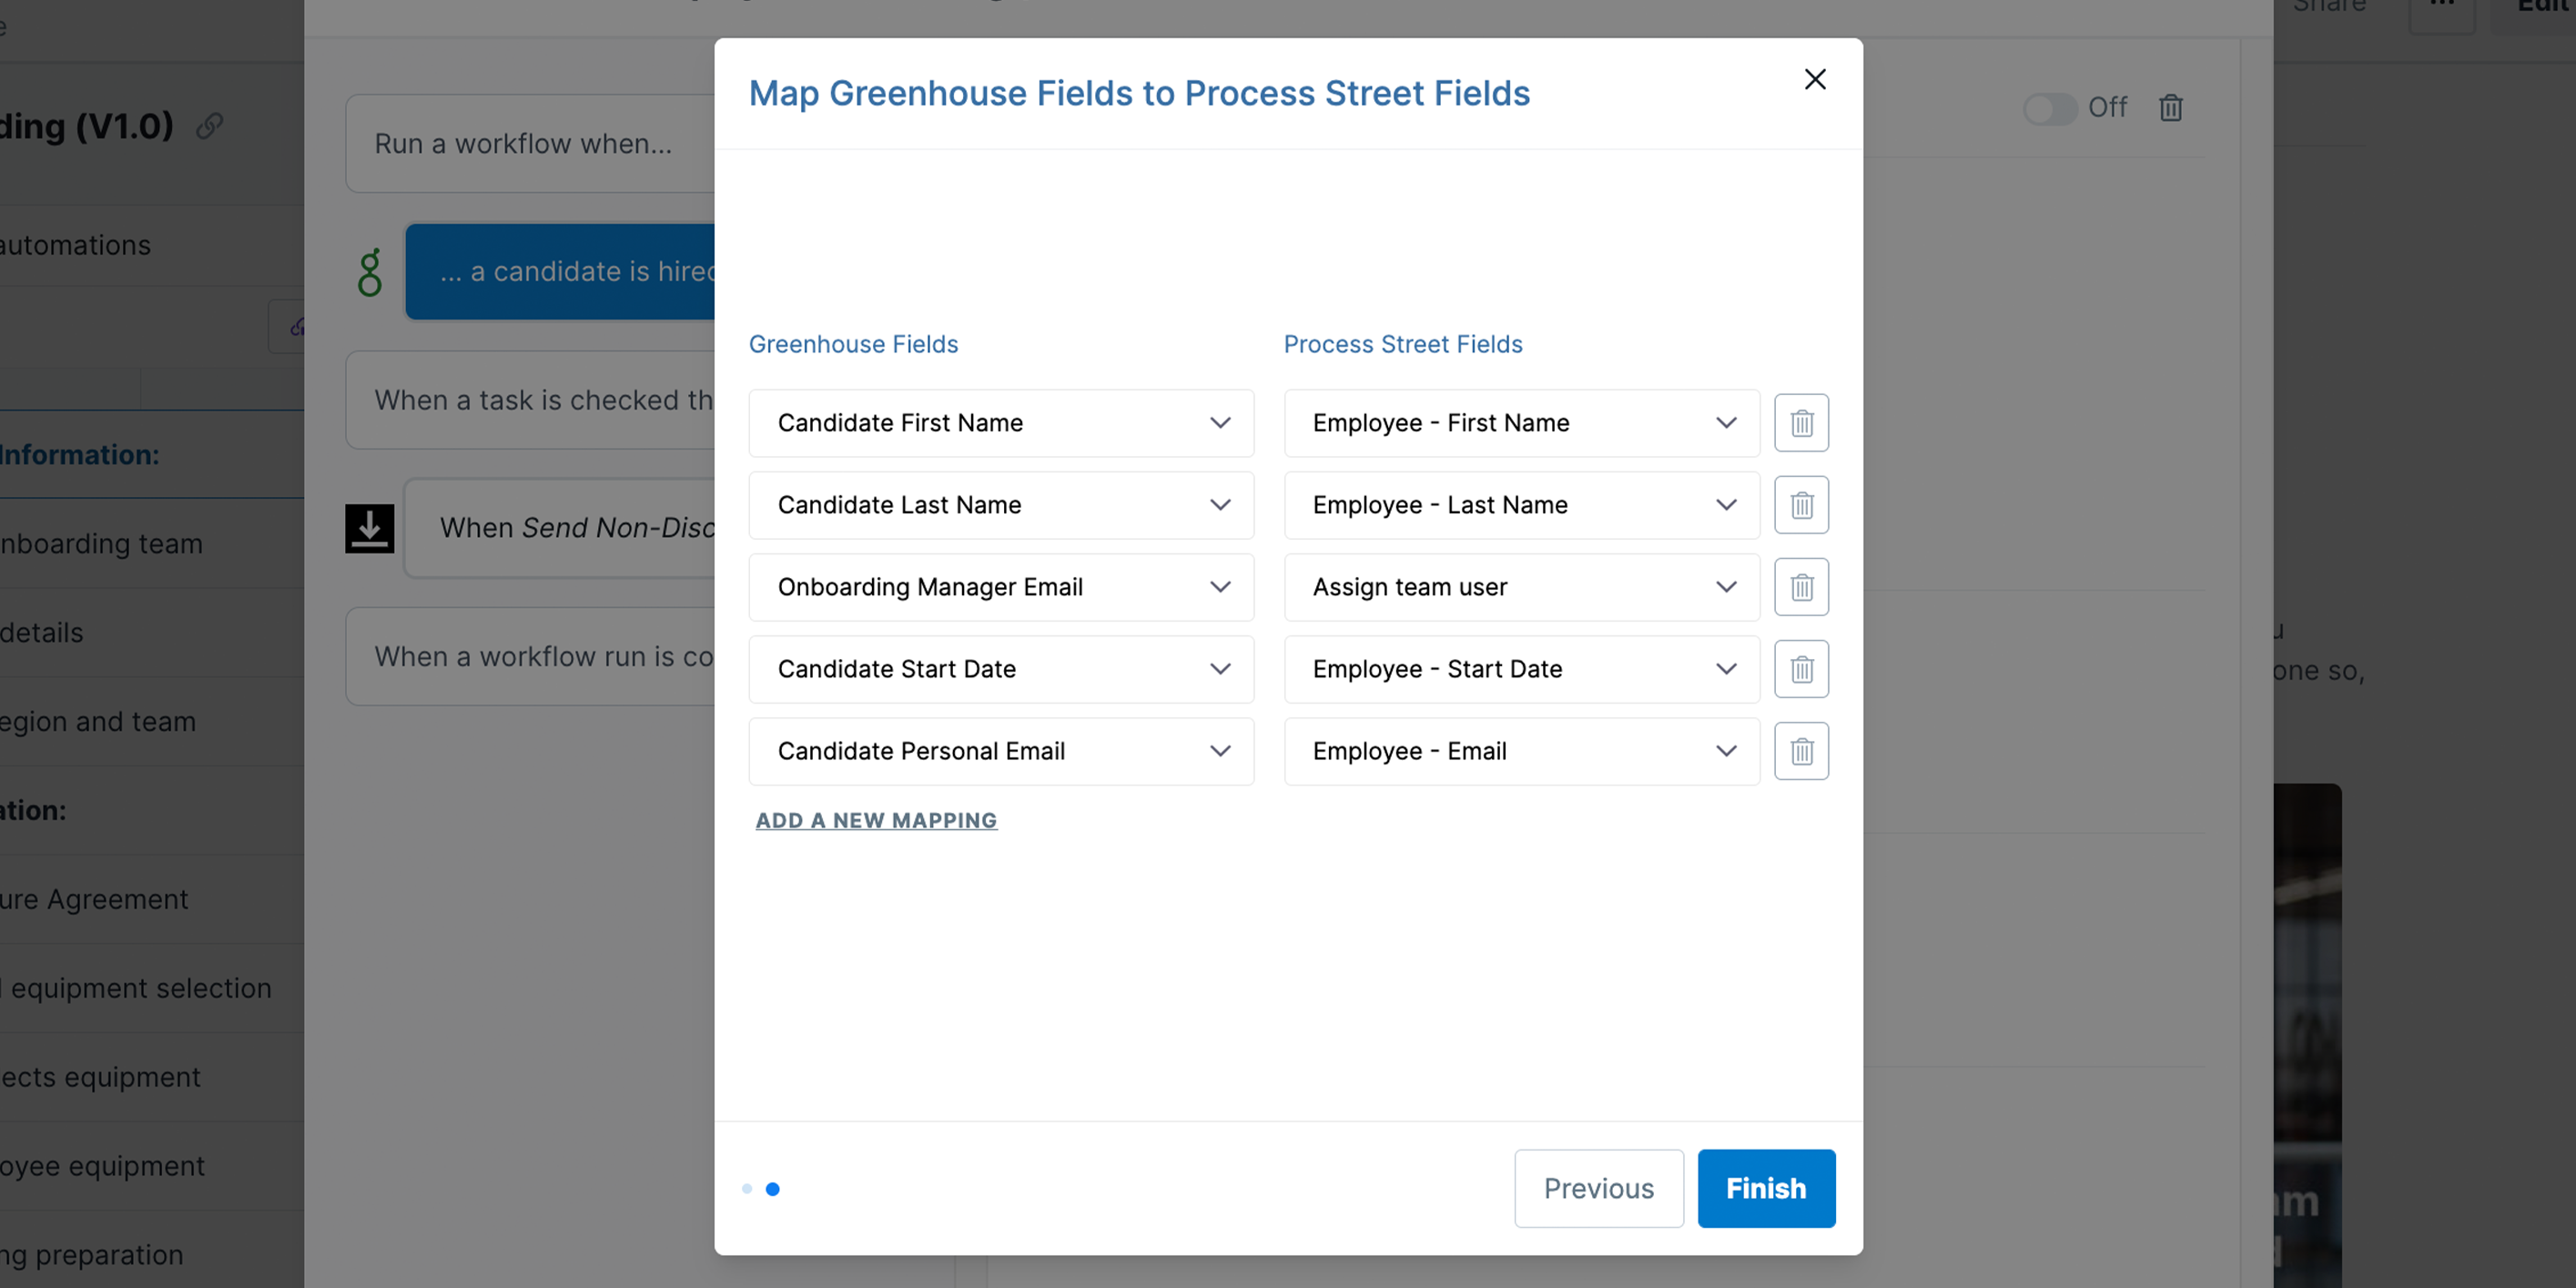 Note: If you’ve created custom fields in Greenhouse, you can add these in manually in the mapping fields, in lower case letters.
When you’re done mapping fields, click Finish and turn on your automation.
Run Names: Workflow run names are automatically generated in this format: <candidate name> – <position> e.g. Santosh Patel – Full Stack Engineer.
To configure the Greenhouse Recruiting / Process Street integration, you’ll need the permission Can manage and configure webhooks.
To assign this permission, find a Greenhouse Recruiting user in your organization with Site Admin permission and the user-specific permission Can edit another user’s advanced permissions to update your account.
Your Greenhouse site admin can update your permissions by navigating to your user page: Select Configure icon > Users > Your Name.

The Site Admin should scroll to the User-Specific Permissions panel on your user page and expand the Developer Permissions dropdown menu.
Select Can manage and configure webhooks in the Developer Permissions section and click Save.
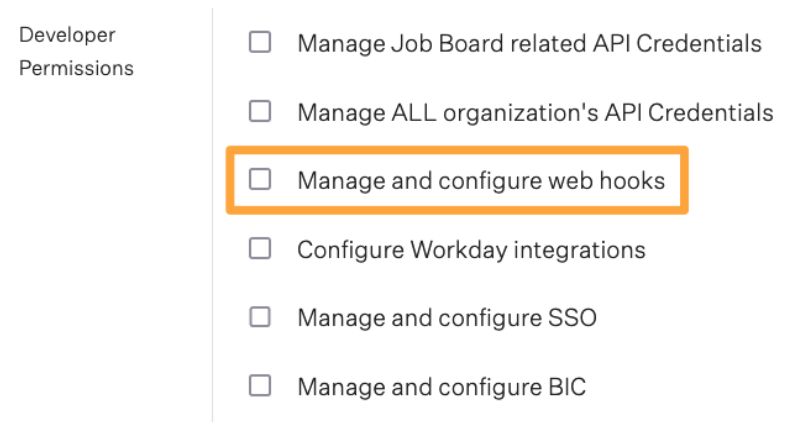
Repeat as necessary for any other user that needs to set up the integration.
Log into your Greenhouse account or create a new account.
Click the Configure icon (cog) in the upper right corner and select Dev Center on the left.
Click Web Hooks on the Dev Center. Click Web Hooks again on the next page, as shown below.
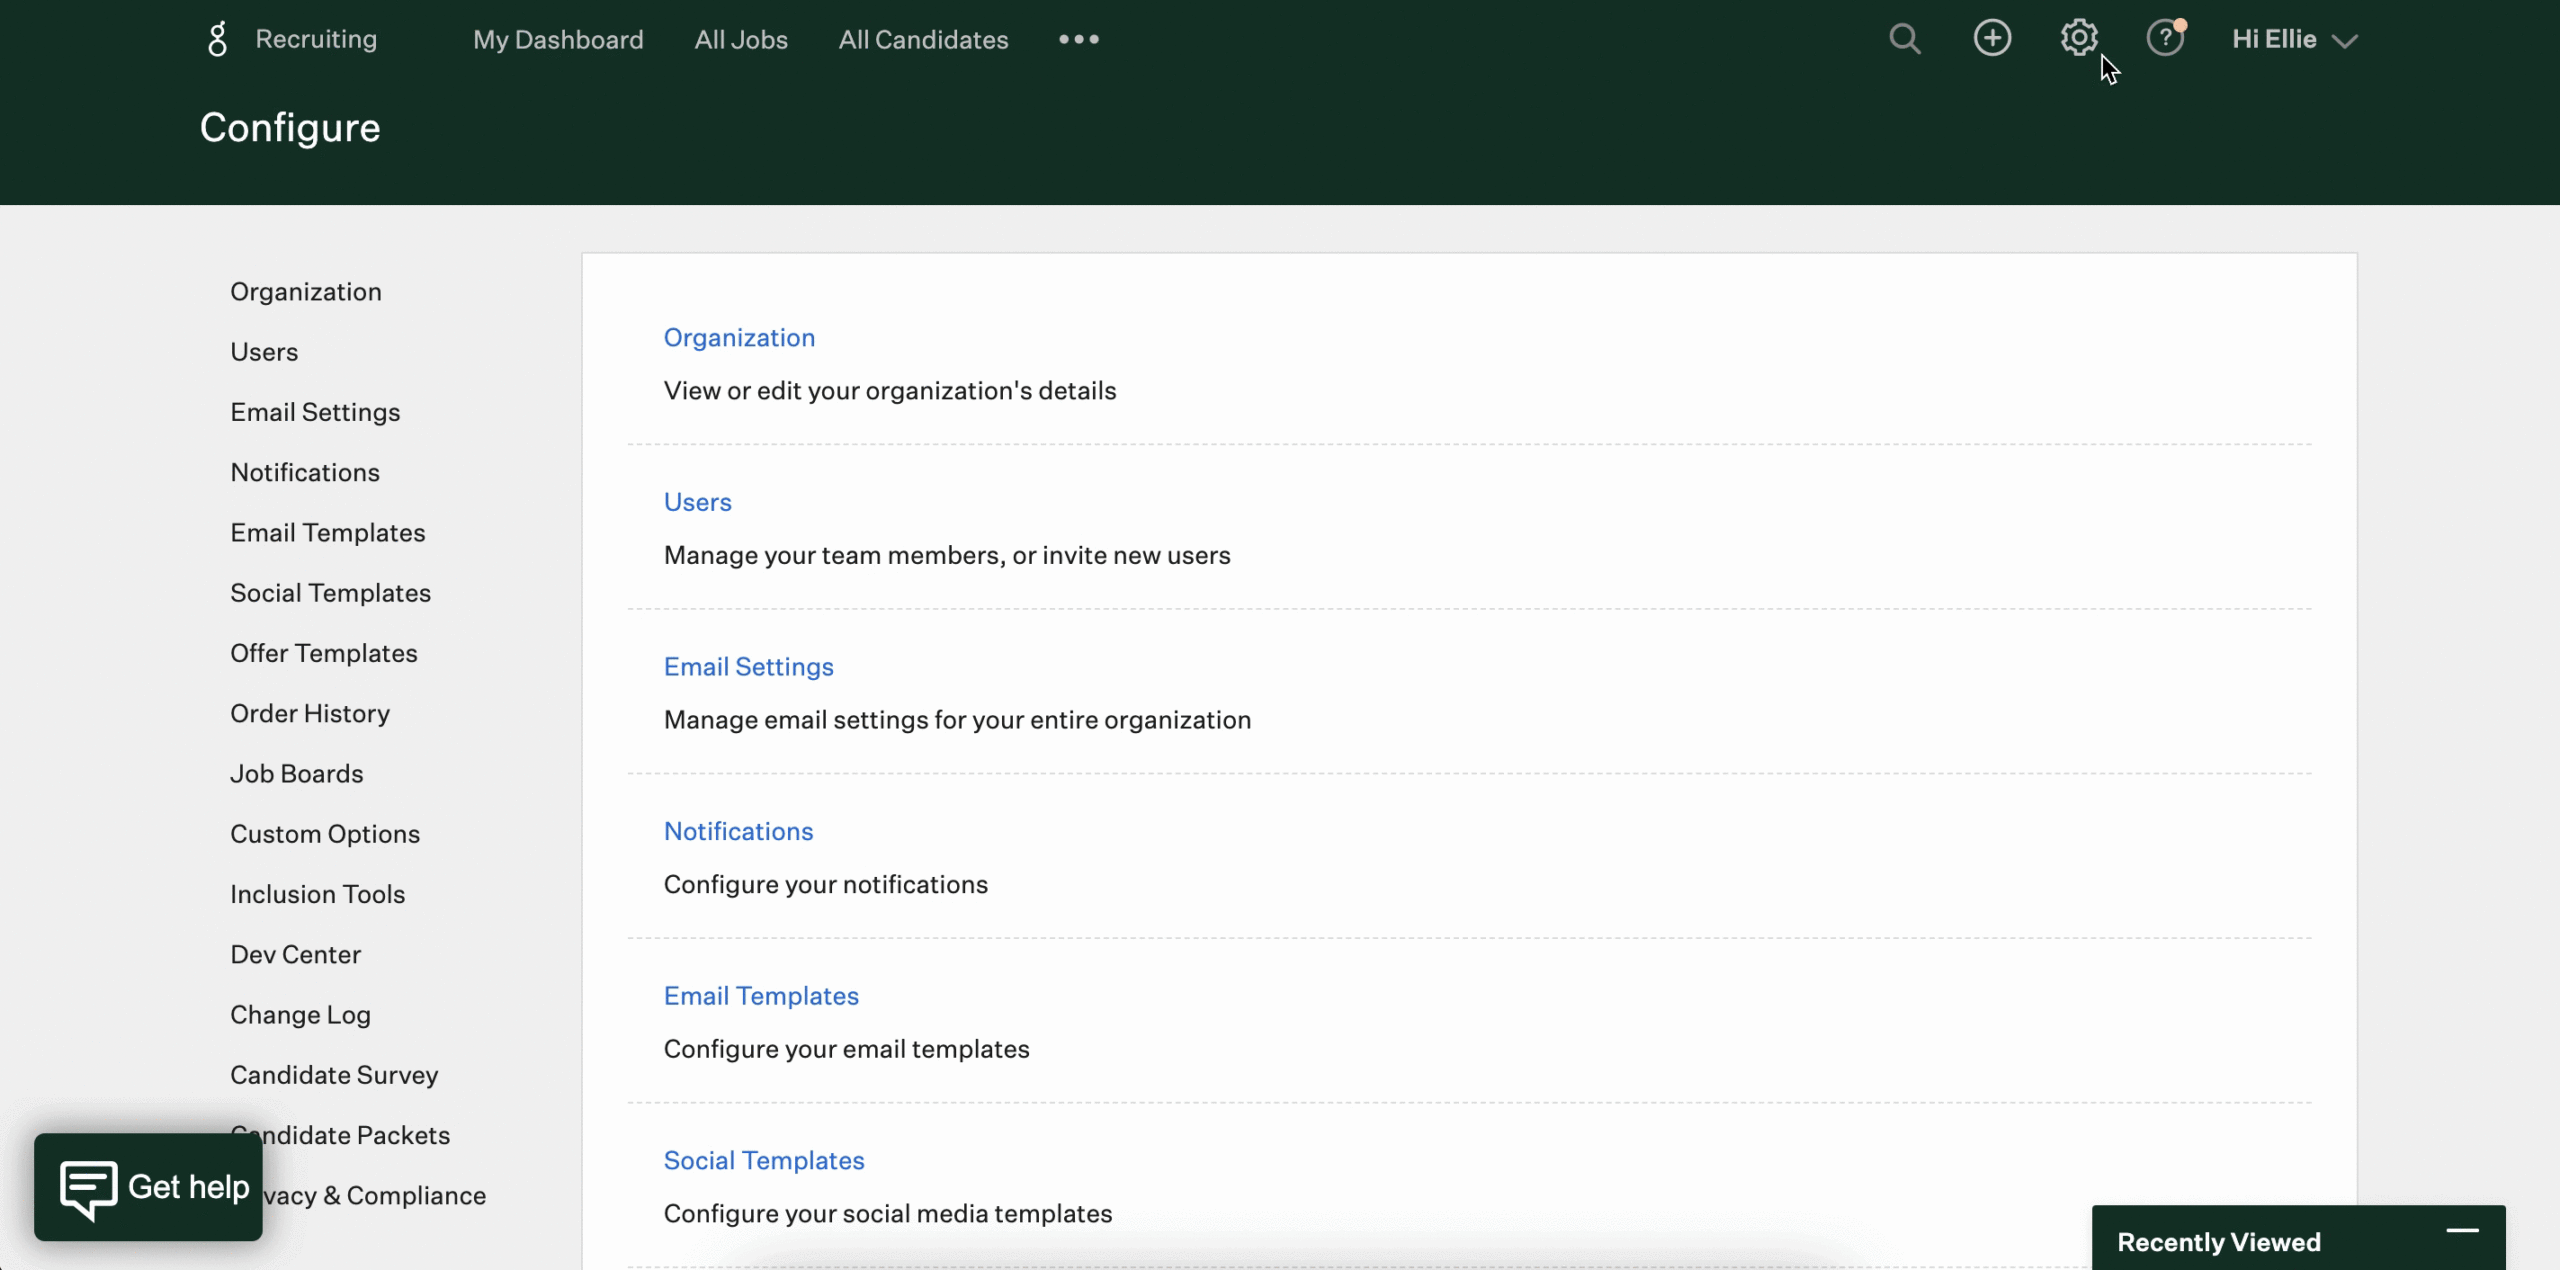 Enter the following information on the next page to configure a new webhook:
Optional: Add your email into the Error recipient email field, if you’d like to be notified of any errors.
When you’re finished, click Create Webhook.
Note: If you’ve created custom fields in Greenhouse, make sure that the name of the field and the immutable field key are exactly the same.
Now that your integration is set up you can test it out.
In Greenhouse, click on All Candidates from the top of your screen.
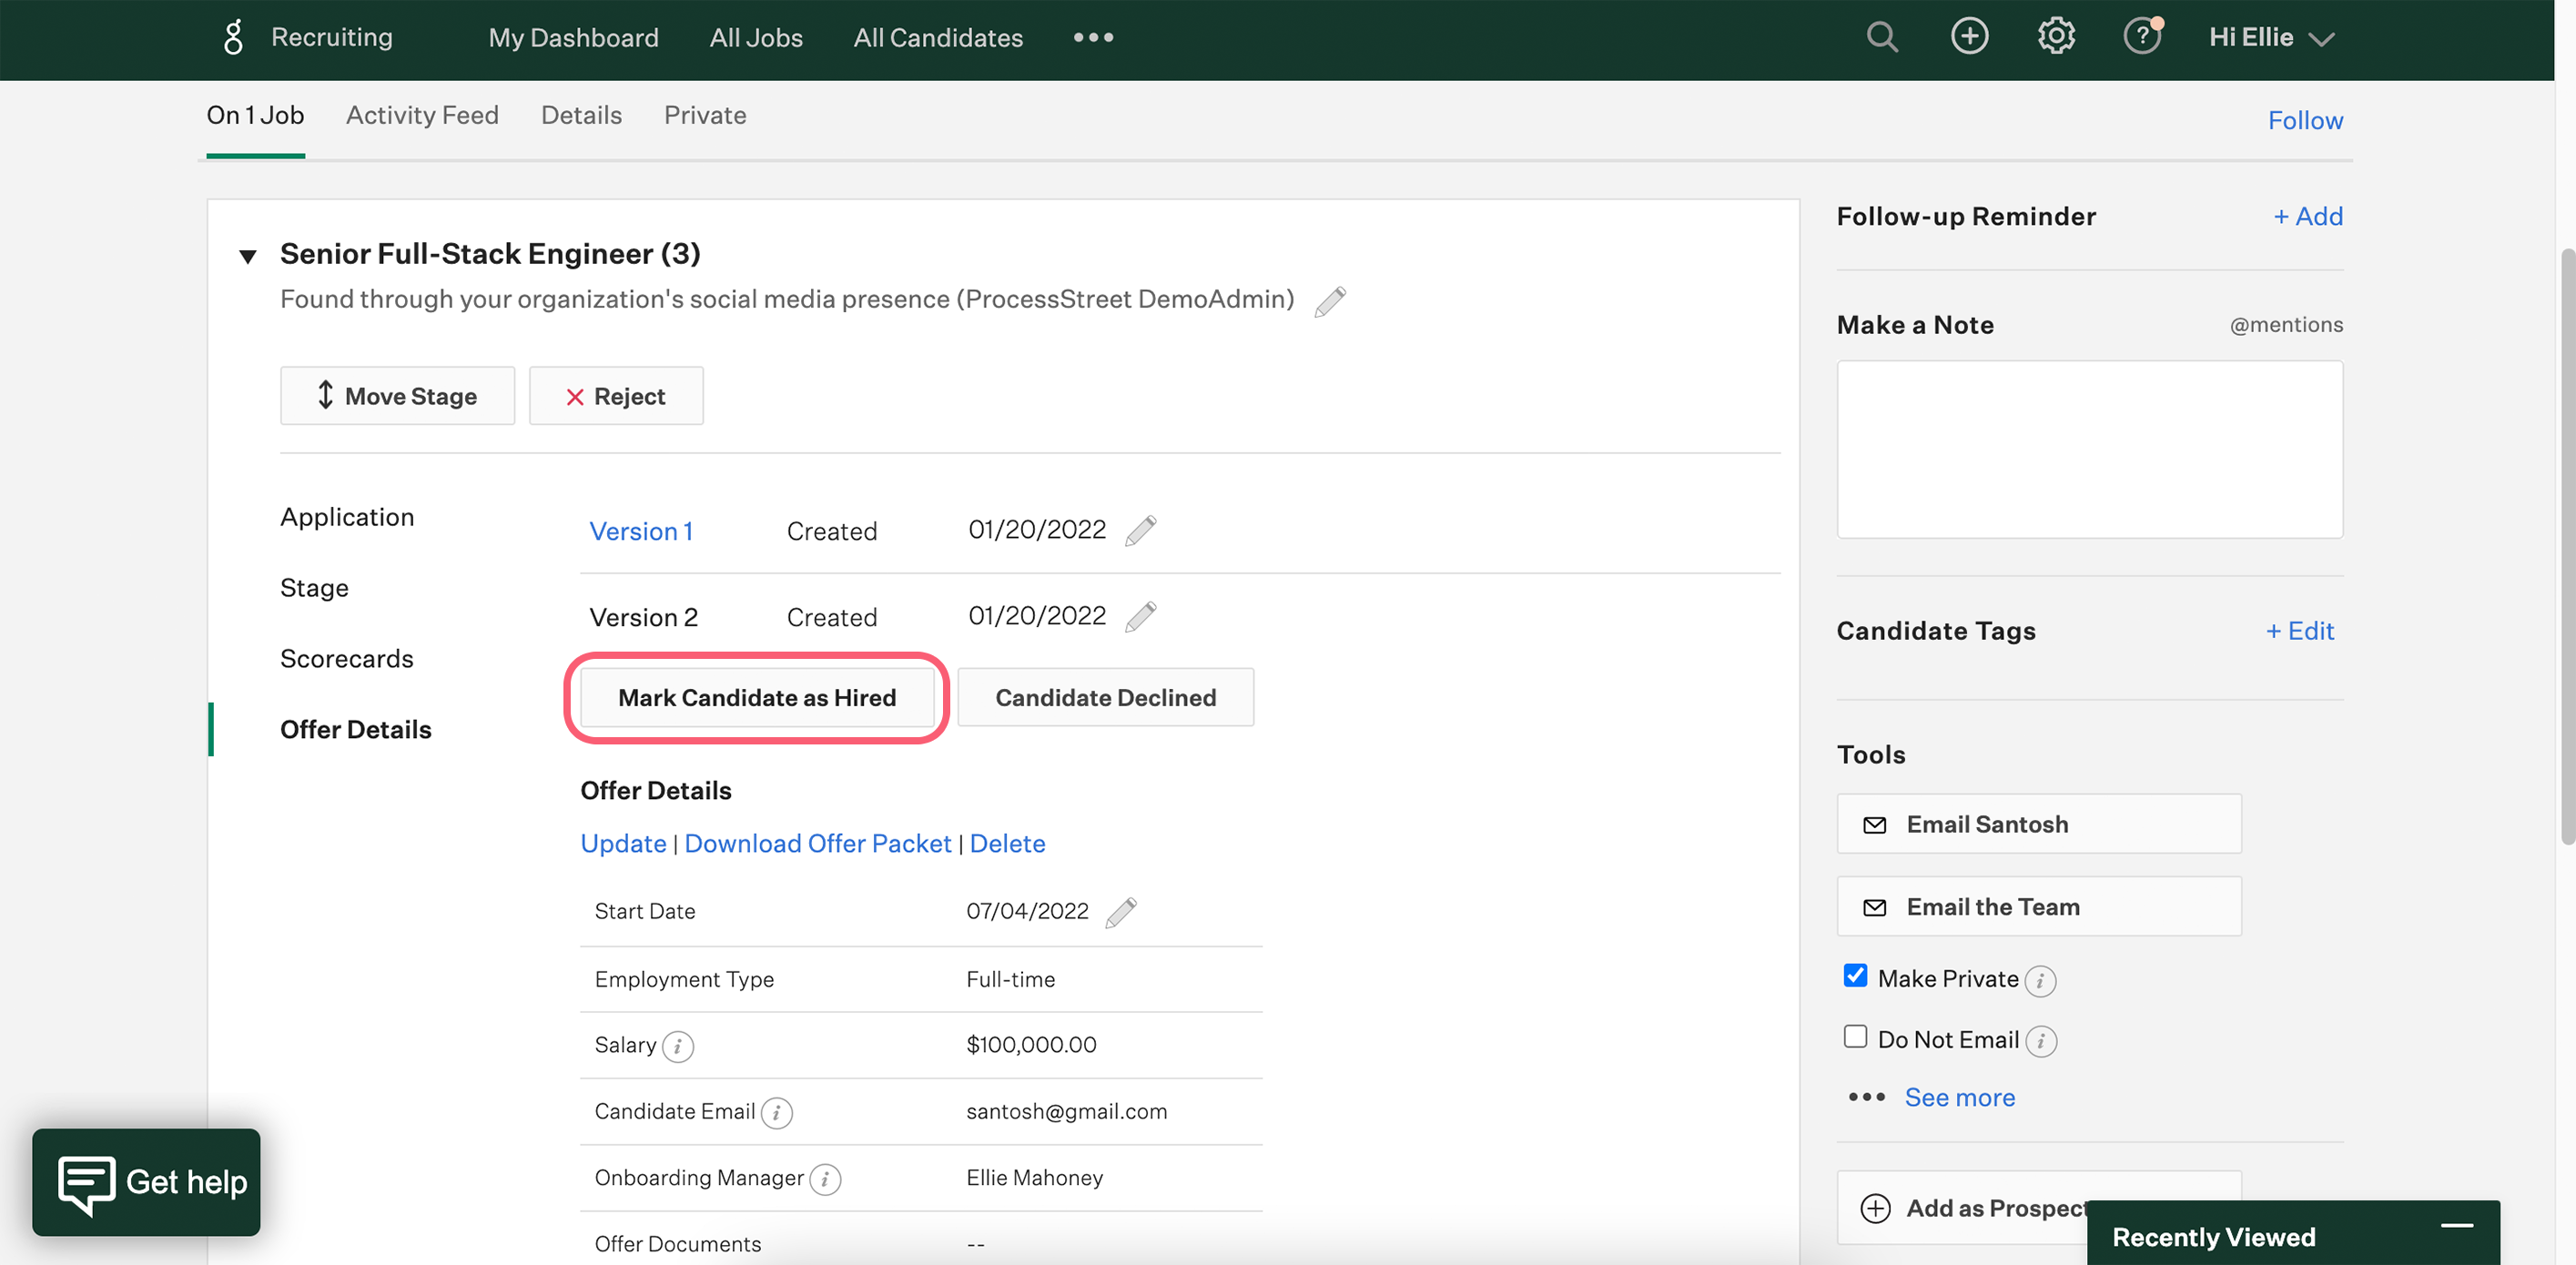
Select a candidate who is ready to hire, click offer details and select Mark Candidate as Hired.
Head back to Process Street and you’ll find your new workflow run with the candidate’s name and role as the run name, plus all the form field data populated in the fields you mapped earlier.
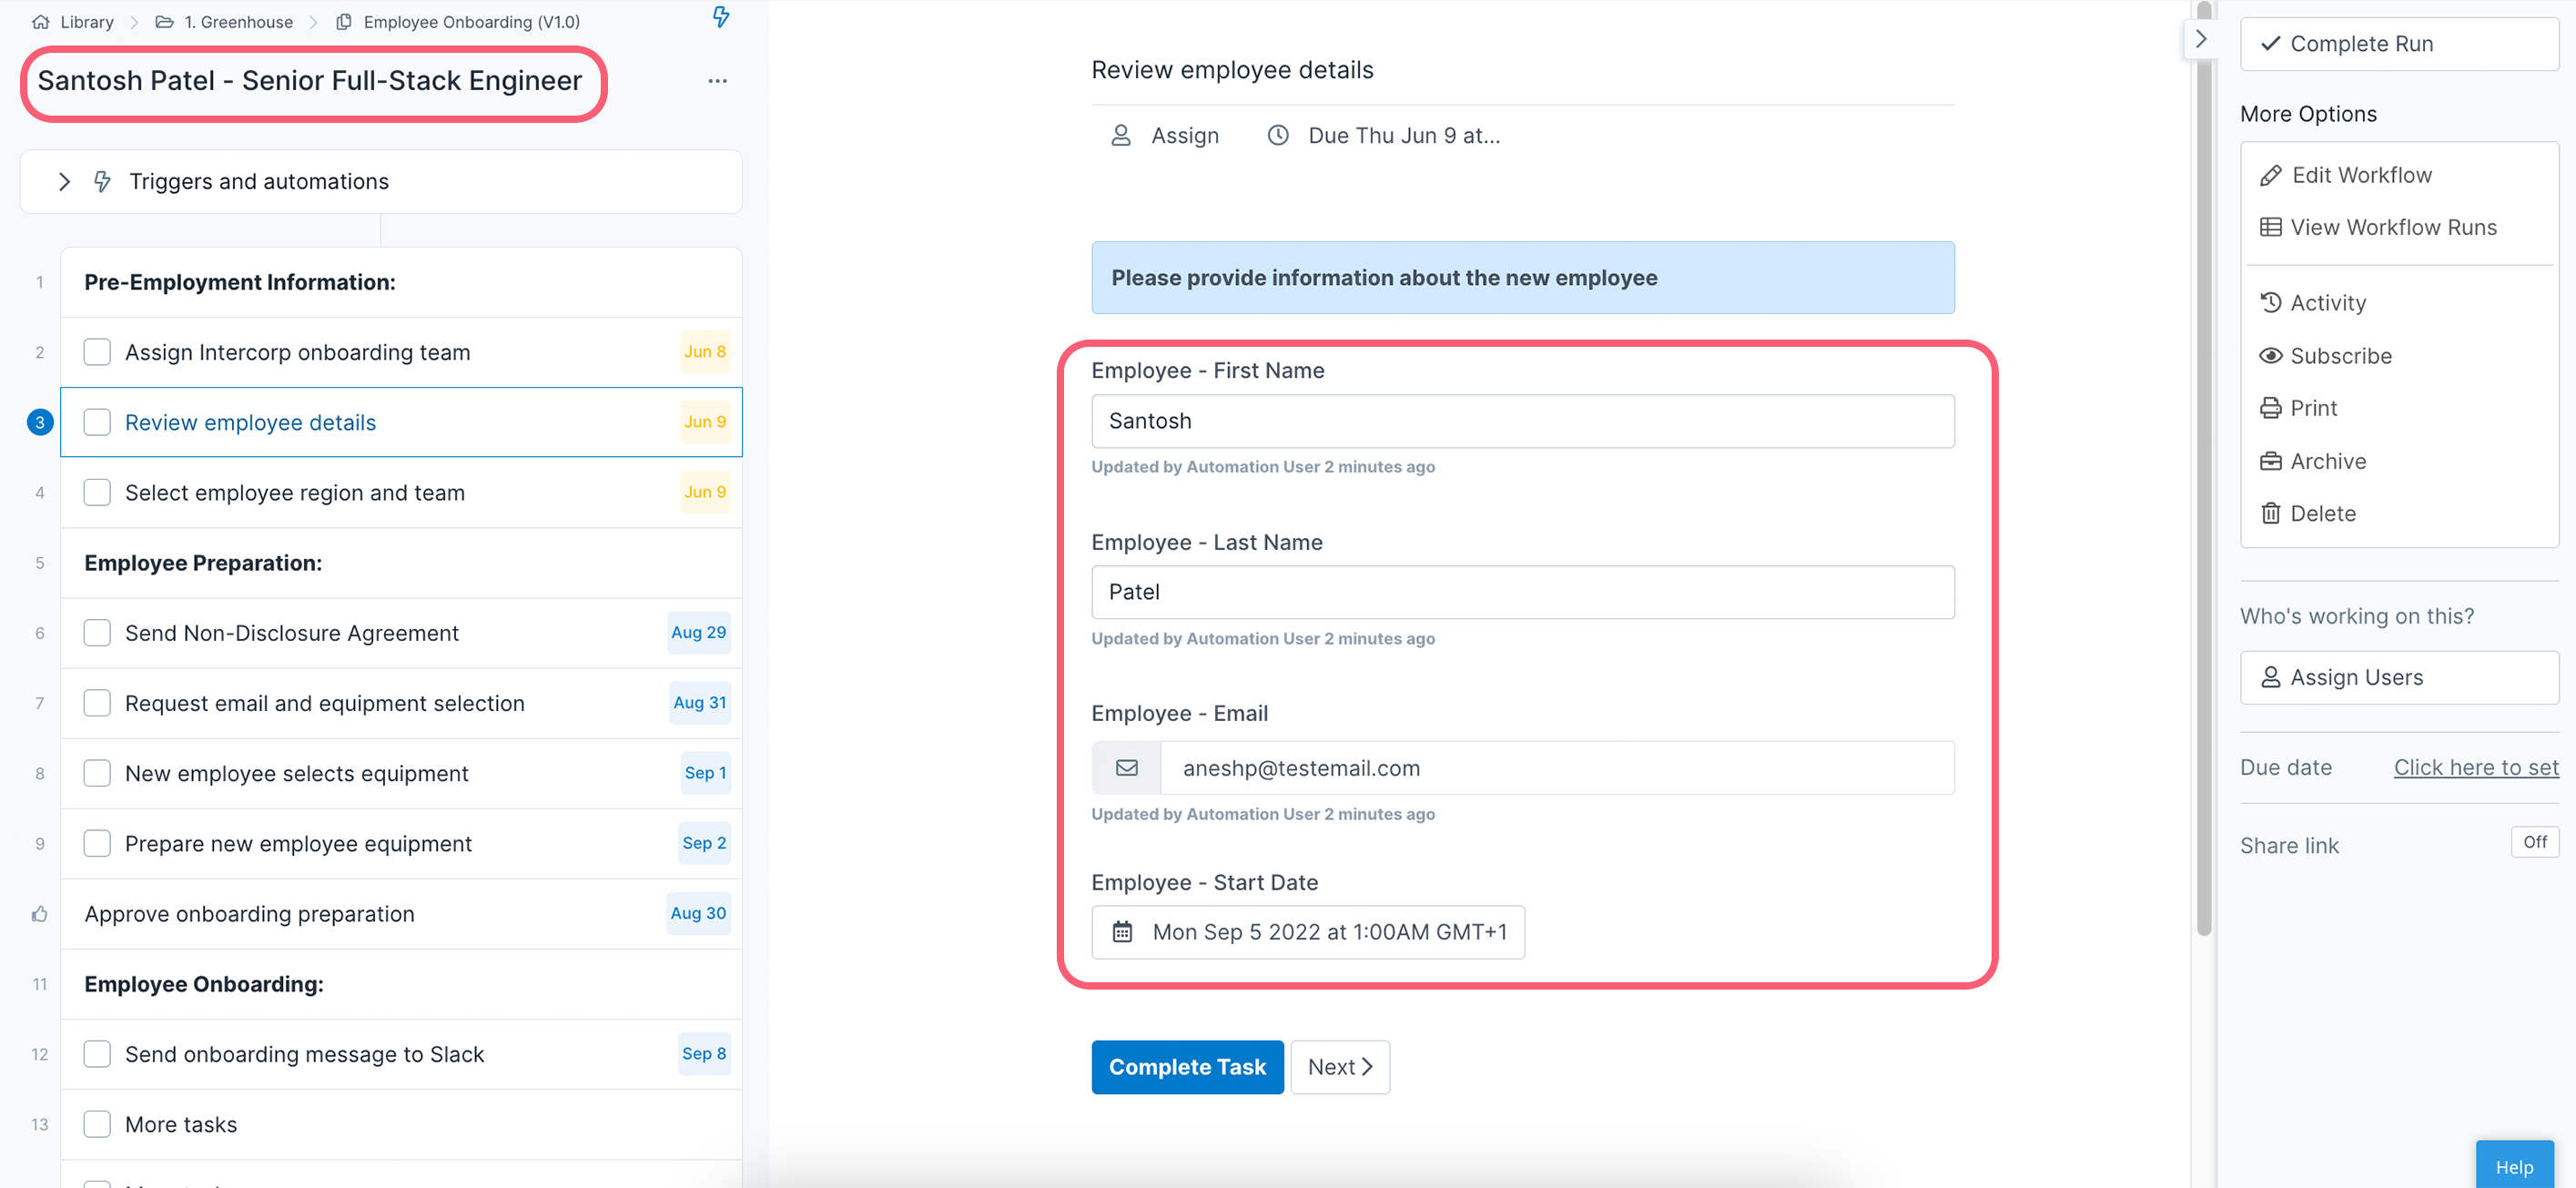
That’s it you’re all set!
To be able to edit the fields you have mapped in your automation, or change the triggers or actions, you first need to turn off your automation using one of the toggle switches.
To remove an automation from a workflow, you can delete it, but first, you will need to ensure that it has been switched off. Turn the toggle switch to the “off” position and then click the trashcan icon in the top right of your view to delete the automation.
There are no filters, delays, or formulas built into automations. To be able to utilize these types of functions, you might want to consider using formulas and functions in a Zapier or Power Automate integration.
If you would like to request that we add another app to our automations, you can do that from the help button in the bottom right corner of your screen. Click “Suggestions” and send us your request.
If your automation stopped running, isn’t working as expected, or is showing errors, there might be a few reasons for this. Please check the following:
If you find that you are unable to run an automation, this could be to do with your user permissions in Greenhouse. Please check with your Greenhouse admin to see if you have the correct permission level to allow you to run automations.
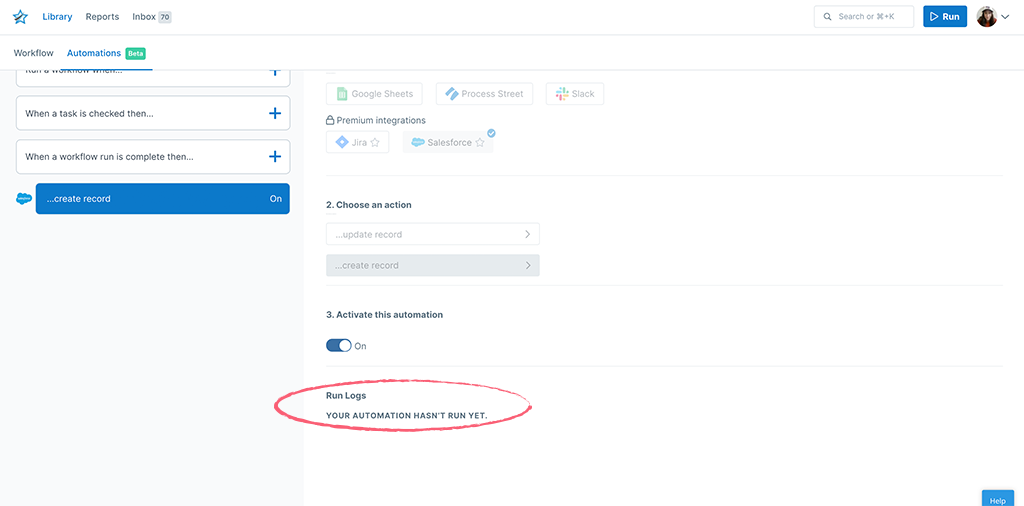
You can check your automation run logs to see how your automations are running, or check for errors. You will find the automation run logs in two places, either when viewing a workflow or on workflow runs.
In your workflow on the automations tab, select an existing automation from the left side of your screen (highlighted in blue below). At the bottom of your page, you will see a list of all of the automation runs for that workflow. If your automation hasn’t run yet, you’ll see a message letting you know.
In a workflow run, in the upper right-hand corner of your task list, you’ll see the lightning bolt icon![]() Click the icon to see the run logs for that particular workflow run.
Click the icon to see the run logs for that particular workflow run.
If you have any errors, click the word “Error” to expand more information on why your automation didn’t run.
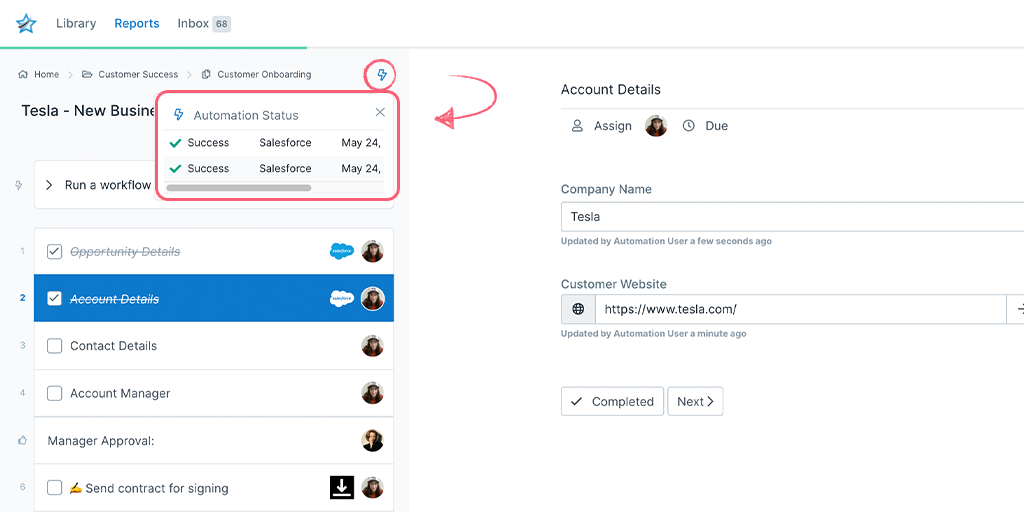
The lightning bolt icon will only show up on workflow runs that have automations configured on them. This is an automation’s idle state.
When an automation is running, you’ll see the bolt change to the ![]() icon.
icon.
Once the automation finishes running, you’ll see either ![]() for success or
for success or ![]() for failure. If it’s a failure, you can click on the X to see the run logs and then click on the “Error” log for more information.
for failure. If it’s a failure, you can click on the X to see the run logs and then click on the “Error” log for more information.
If you have any questions about using Automations, please reach out to our Support team.