
Jira helps teams plan, assign, track, report, and manage their work together in teams or in cross-departments. You can integrate Jira with Process Street to make your workflows super powerful and automate your work via Webhooks or Zapier.
A Webhook integration can bring information from Jira that would trigger a new workflow run in your Process Street account. Webhooks are automated messages or payloads sent from apps as a trigger to cause an action in a receiving app.
In this example, we will create a Webhook that runs the Customer Support Tickets workflow when a new issue is created in Jira.
Now, let’s jump into the integration.
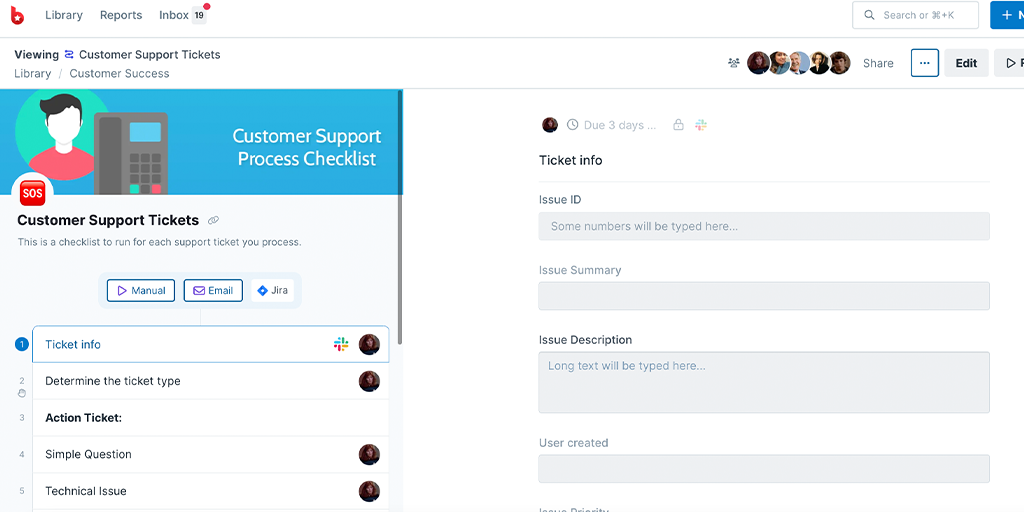
First, create a Workflow in Process Street and ensure to add form fields that are relevant to the data fields in Jira. This will help you to map the relevant information from Jira to Process Street.
This information is stored in Jira when an issue is created. So, we need to create relevant form fields in our workflow to push that information through to Process Street. For our example, these form fields should include the issue ID (number field), issue summary, user who created the issue (short text fields), issue description (long text field), and so on.
This will mean that whoever is working on the support ticket won’t have to look up information in Jira, but can instead see all the details in Process Street.
Log into your Jira account or create a new account. Since we want to trigger a new run in Process Street when a new issue is created, we will be working in our project dashboard in Jira. If you don’t have any project yet, you can start by creating that first.
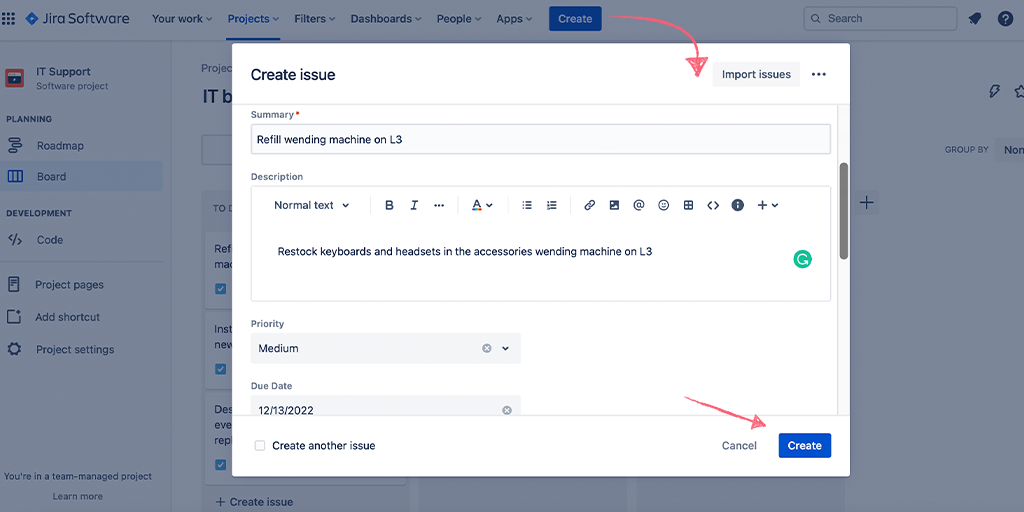
To create a new issue, click Create in the top centre of your screen and add the details like issue summary, description, tags, and other details you may want.
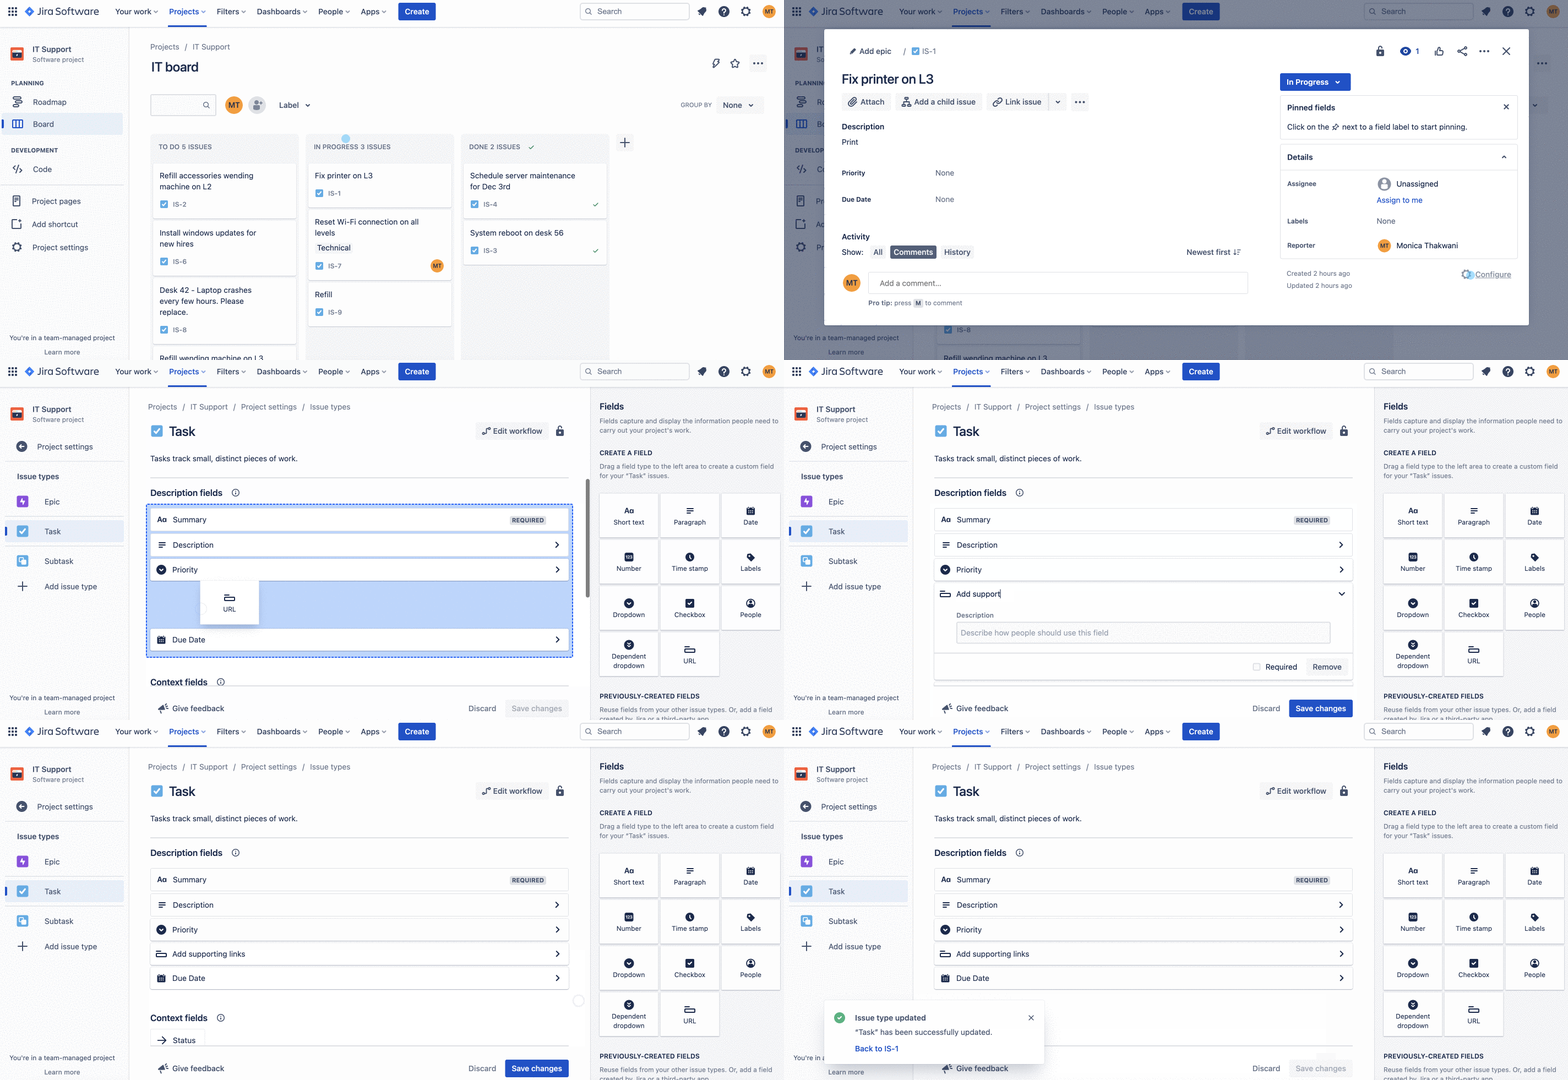
Note: You want to ensure that the form fields you have in your workflow match the fields you have in Jira. If you’d like to add more details to your Jira ticket, you can click on any existing issue and configure the issue type.
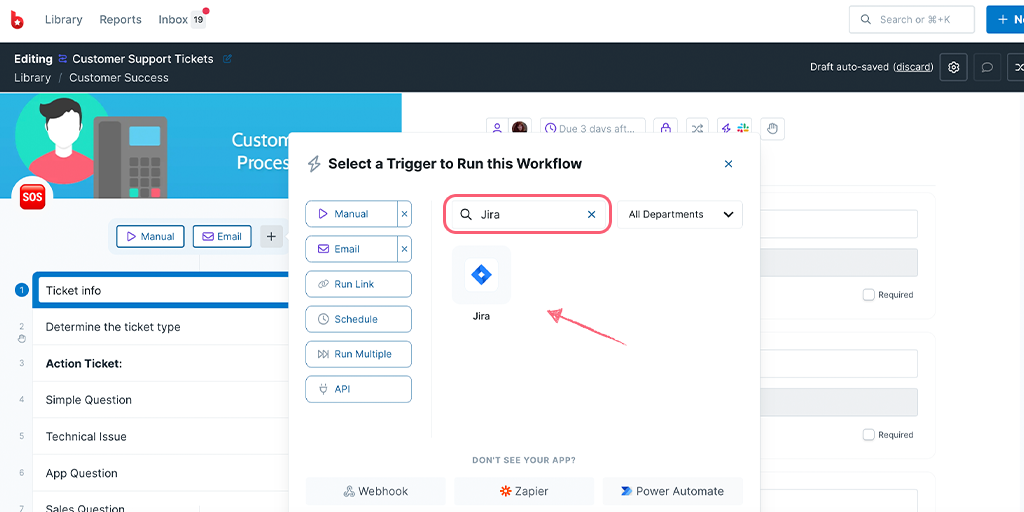
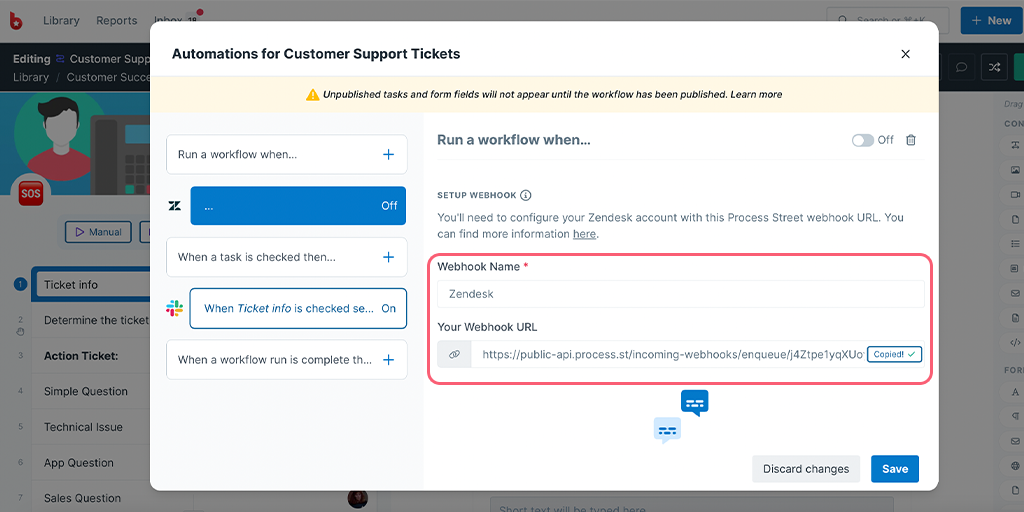
To get the webhook URL from Process Street, when you’re editing your workflow, click the + icon above your task list on the left. Here, you can look for Jira as a Trigger to Run this workflow.
You can name your webhook as the app name or any phrase that helps you identify the Trigger. Then copy your Webhook URL and select your event as Default.
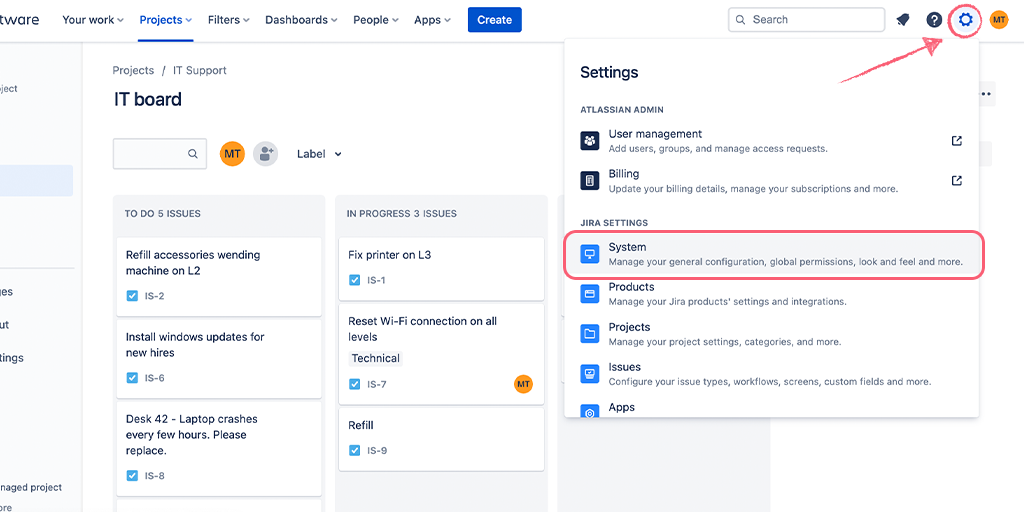
Click on the settings Cog in the top left corner and go to the System.
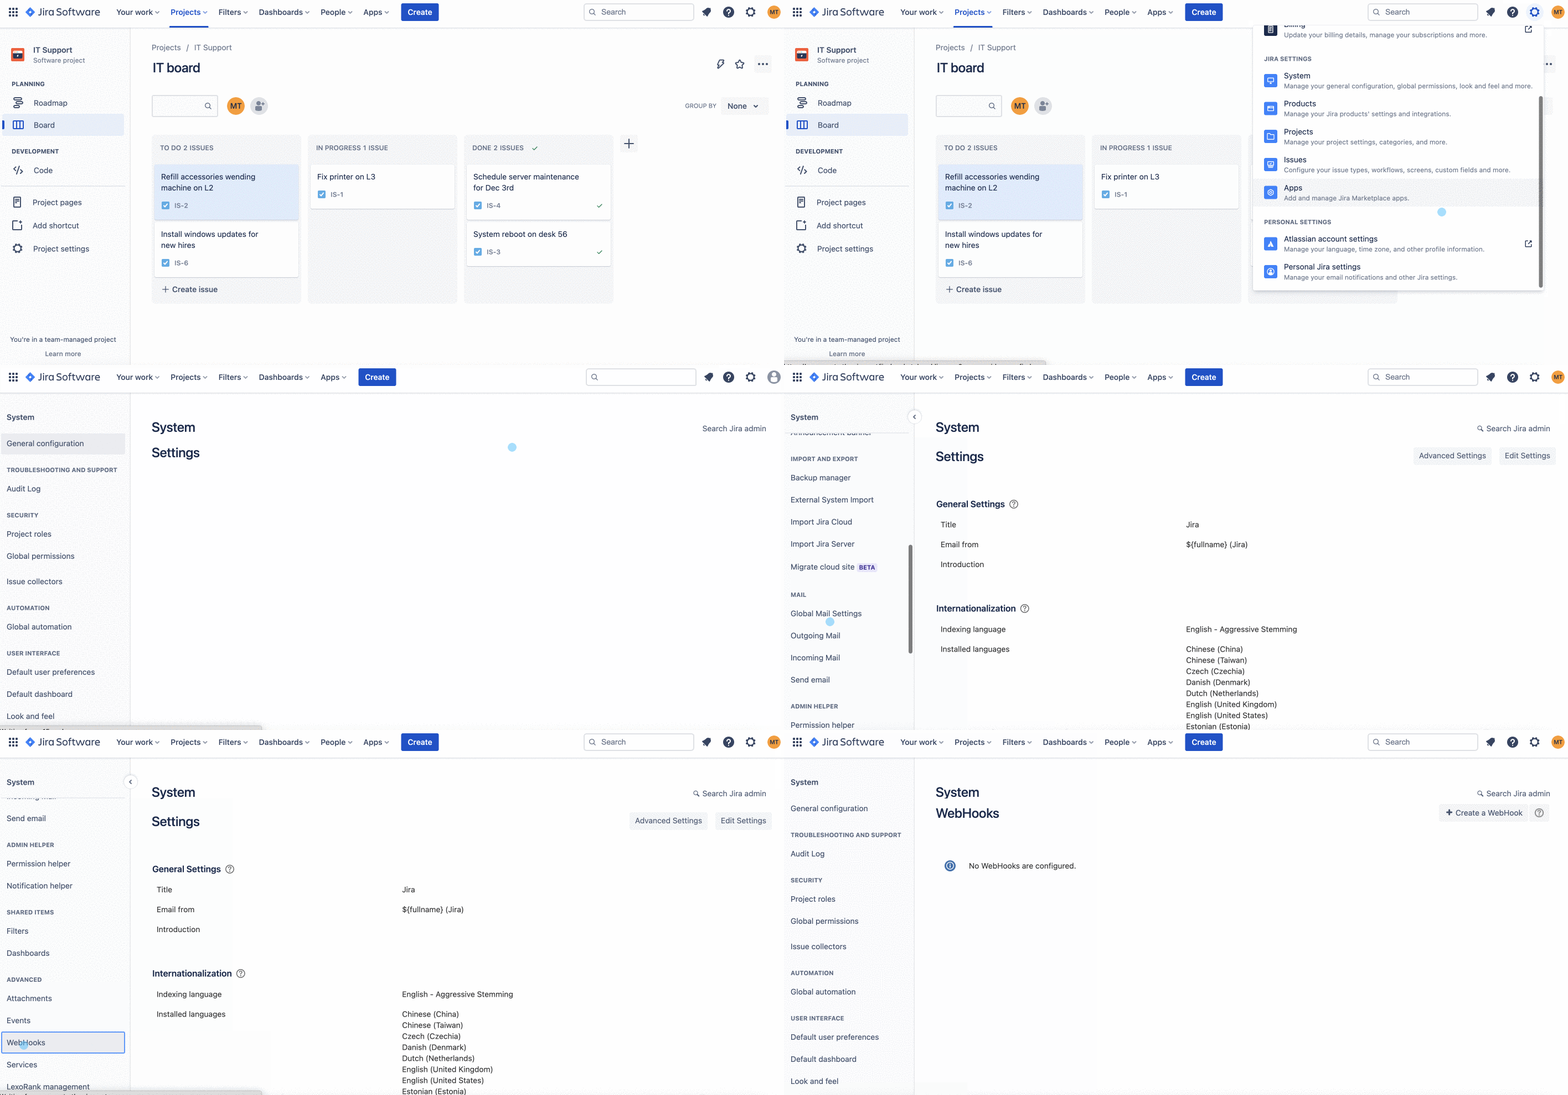
Then click on Webhooks under Advanced Settings in the left panel. Then click + Create webhook and fill in all the fields as shown below.
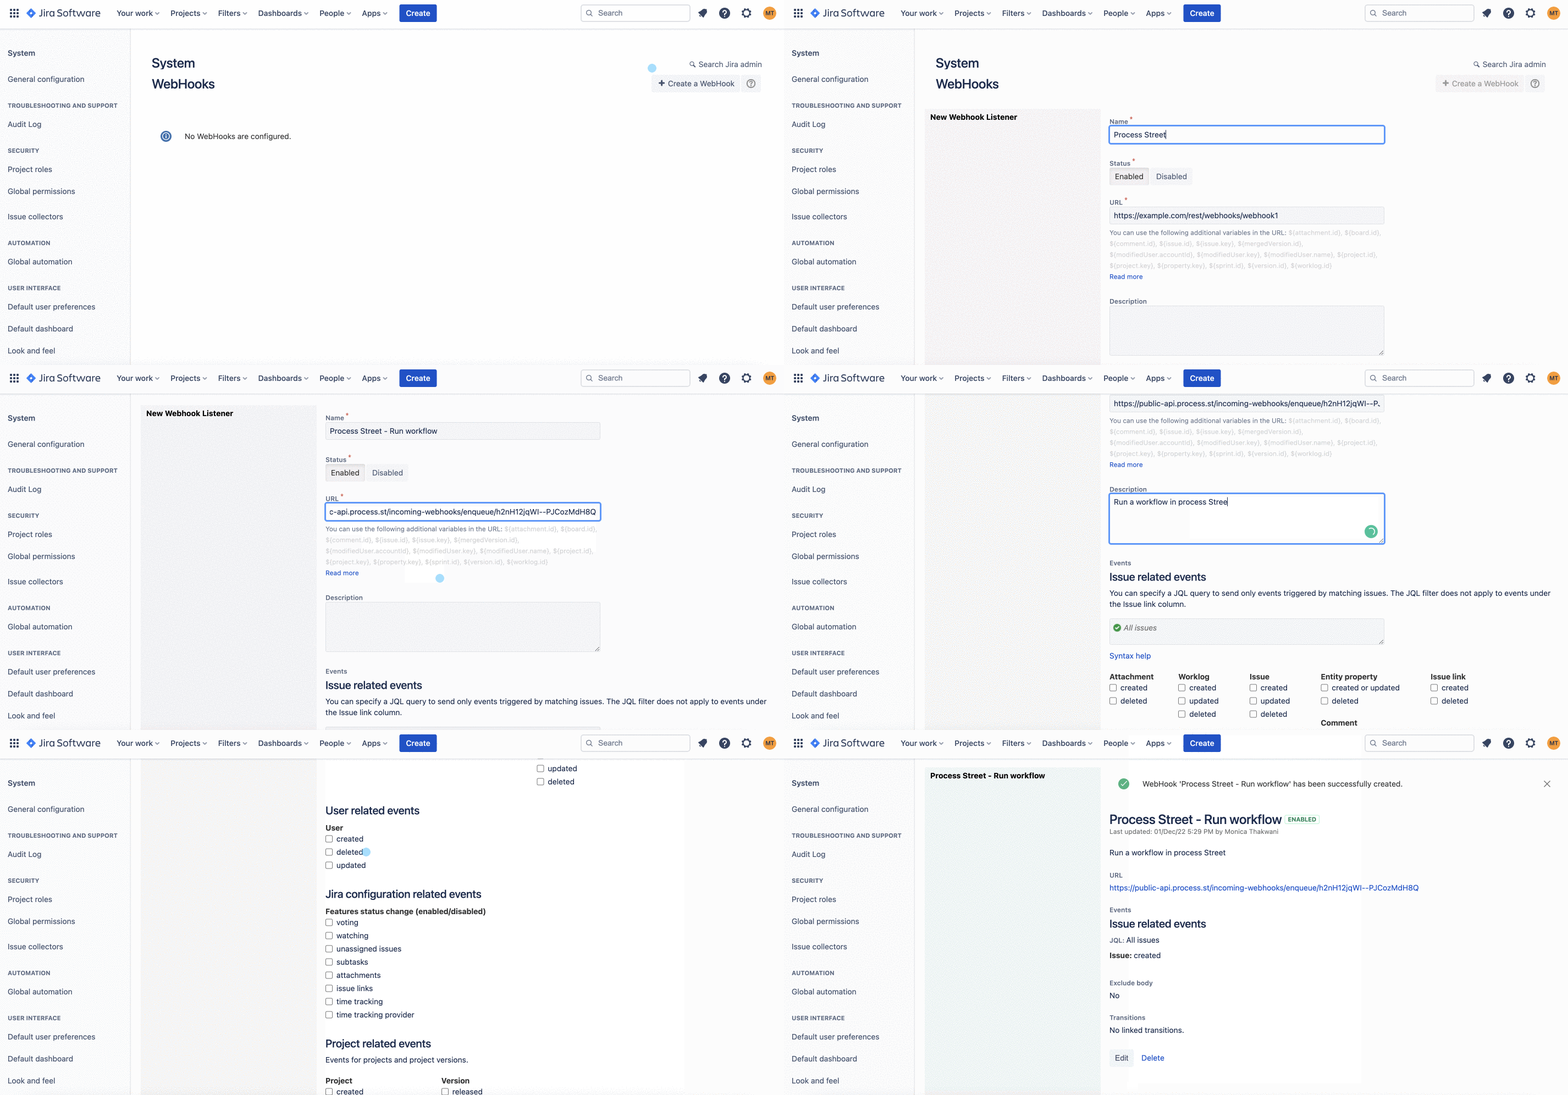
Note: Since Process Street needs to receive the JSON body, ensure to leave the “Exclude body” box unchecked.

If you’re looking for more help on how to set up your webhook in Jira, you can refer to their help doc here.
Now come back to Process Street and test your trigger. Your payload should return as a success but if it doesn’t, you might want to go back to Jira and create a new issue.
When your test returns successful, you can proceed to map your fields from your issue’s properties to your Process Street form fields.
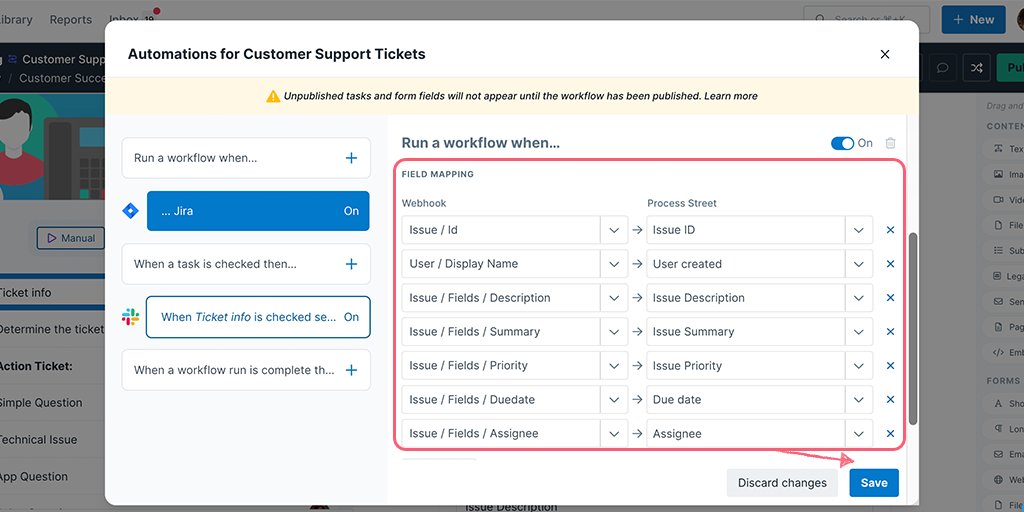
Lastly, turn your webhook On and Save it. Then Publish your workflow and you’re all set!
As an extra step, you can go to Jira, create a new issue then come back to Process Street in the Reports Dashboard to confirm a new workflow is run.
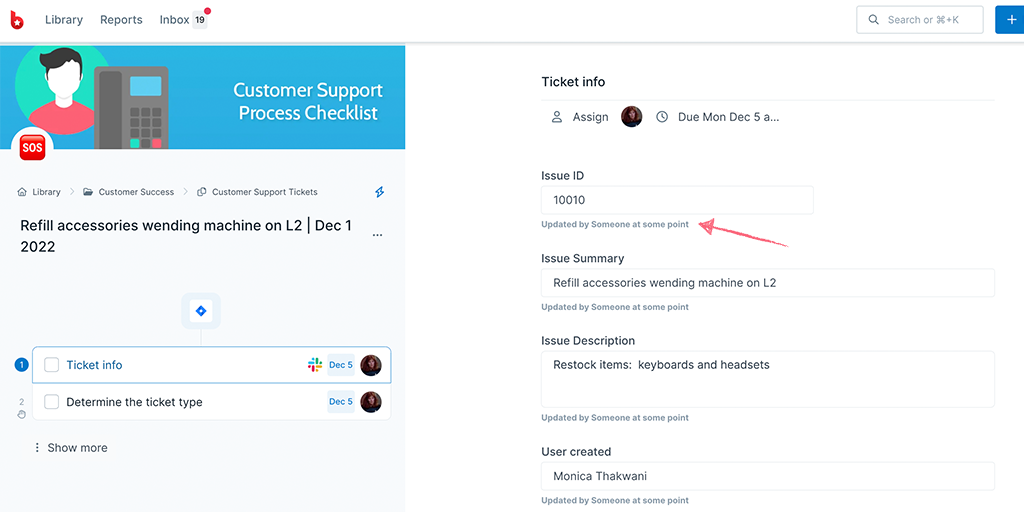
Lastly, turn your webhook On and Save it. Then Publish your workflow and you’re all set!
As an extra step, you can go to Jira, update a deal stage to Closed Won then come back to Process Street in the Reports Dashboard to confirm a new workflow is run.
Zapier connects over 1,000 apps together. It’s an “if this, then that” tool, meaning that once a trigger has occurred, an action will then take place. This helps to save you time and effort by automating processes.
In this example, we will look at how Jira can be integrated with Process Street so that when a new company name is added to Jira, a new client onboarding workflow is run.
You can integrate Process Street with Jira, using Process Street’s Automations.
This integration allows you to create an issue in Jira automatically, when a task is checked, or when a workflow run is completed.
Users: In order to create or update Automations, you must be an Administrator or a Full Member with “edit” permissions.
Before you get started you’ll need to have a few things set up in Jira Software, and in your Process Street workflow.
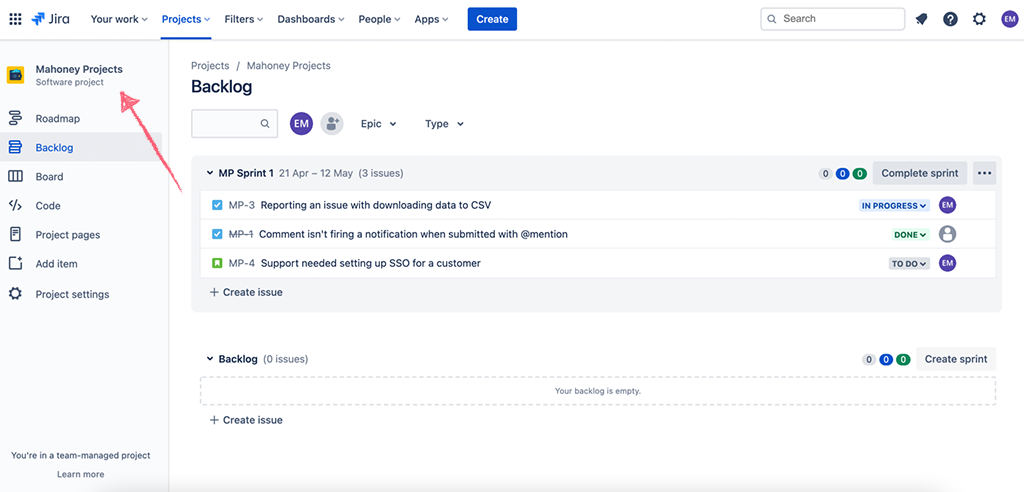
Now you’re ready to go ahead and start creating your automation!
Head to your library and open up the workflow you’d like to create an automation for. When viewing the workflow you will see the “Automations” tab next to the workflow tab, as shown below.
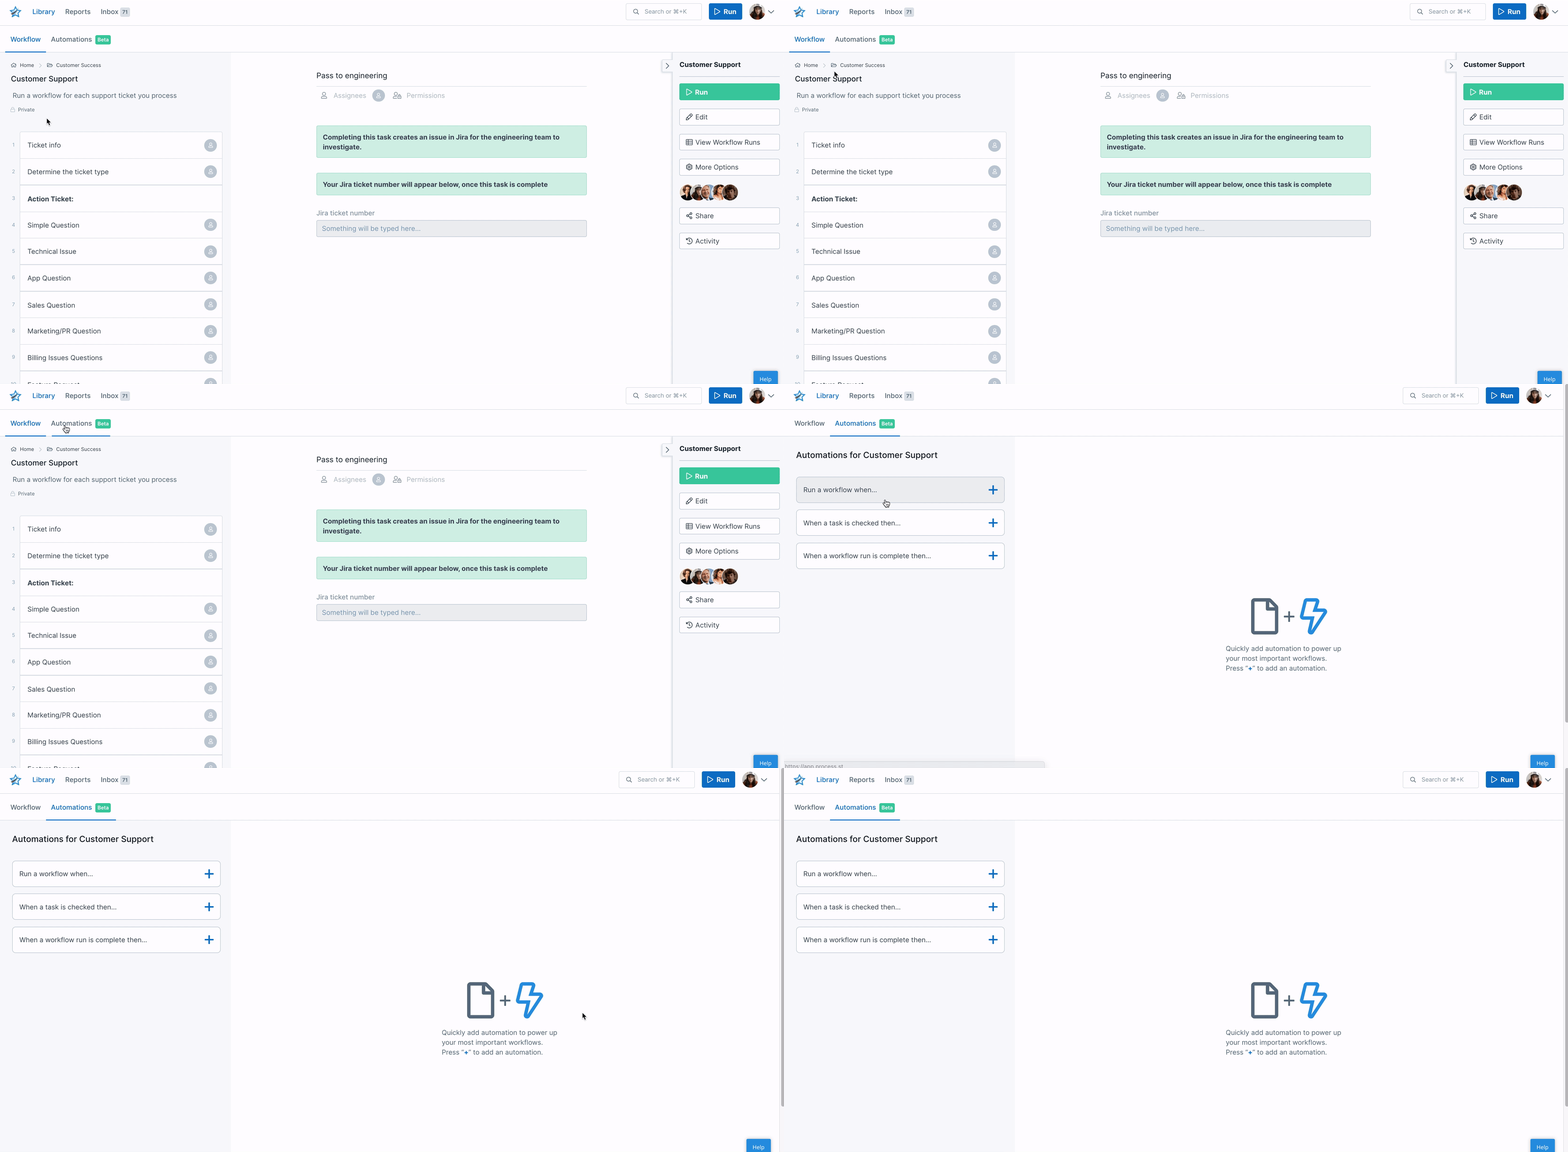
Start by selecting the trigger for your automation from the left side of your screen. This will be the event that will cause the automation to start (like a starting pistol being fired to kick off a race).
For Jira you can choose from these two triggers:
Click the + button on your chosen trigger to get started.
Let’s walk through examples for each of these triggers and their respective actions.
Select “When a task is checked then” from the left side of your screen.
Start by selecting the task in your workflow that will act as your trigger.
Next, click the Jira icon and a small tick will appear to confirm your selection.
Select the action “create issue”.
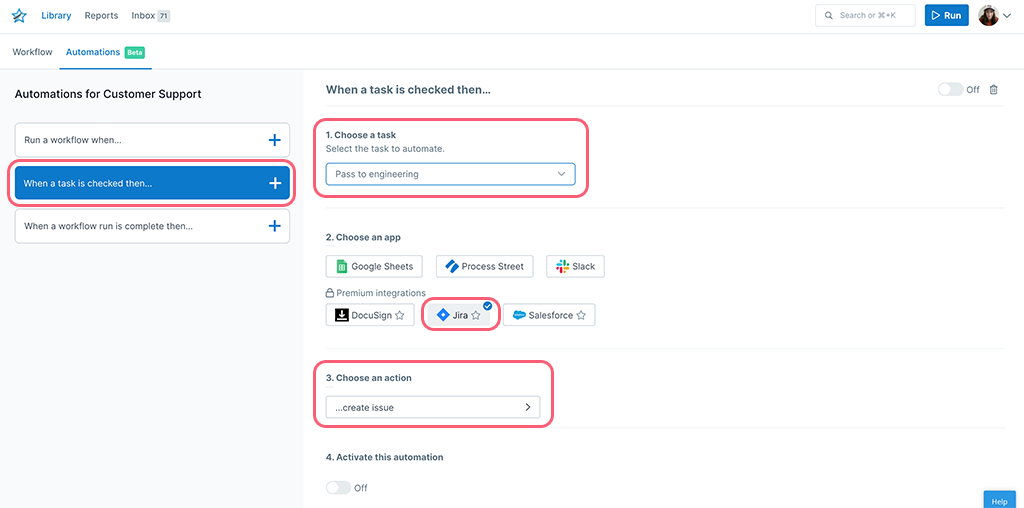
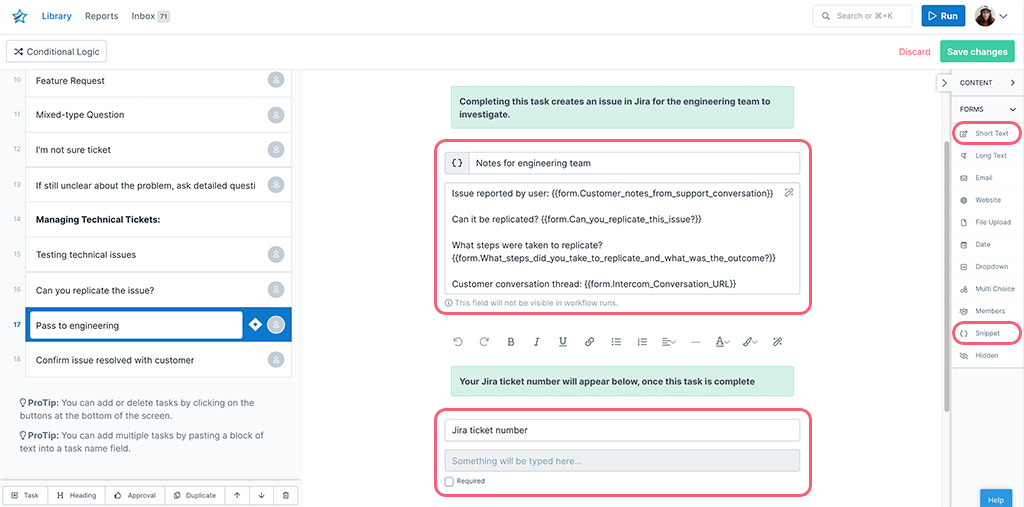
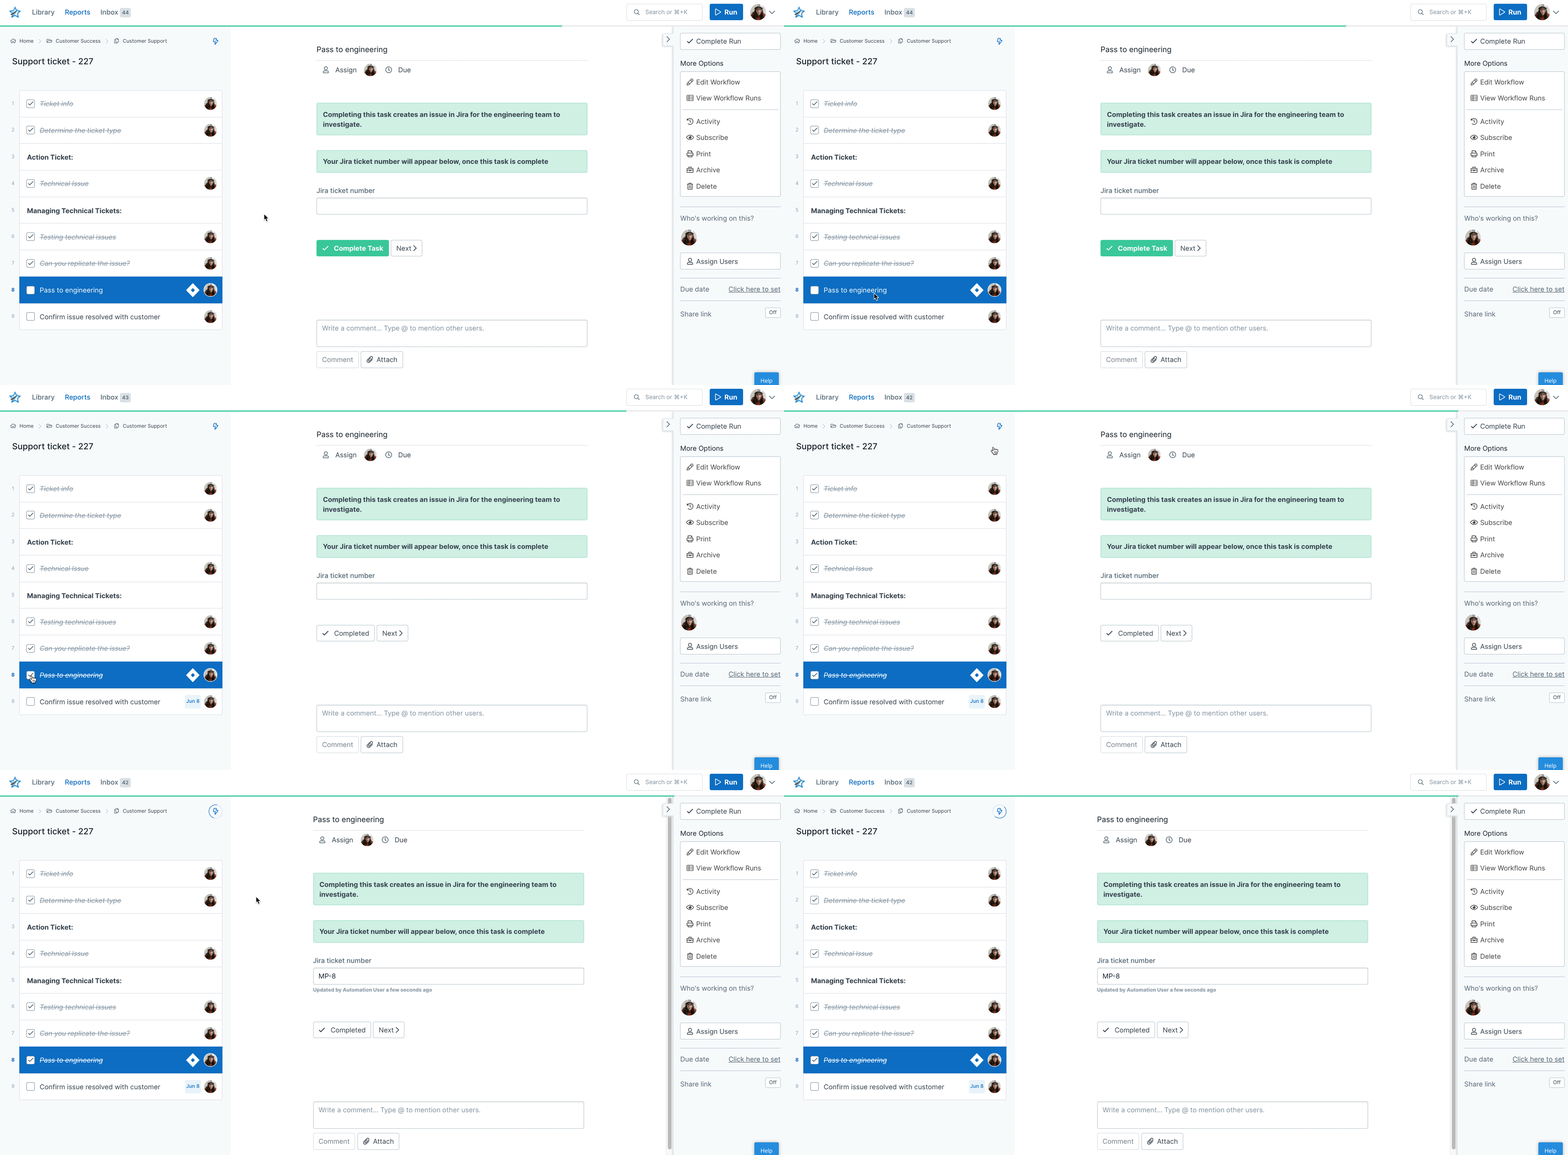
Putting it all together, in this example, completing the task “Pass to engineering” in your customer support workflow run creates a Jira issue for the engineering team to investigate. It also adds a note of the Jira issue number back into the workflow run, so that you can refer back to it later.
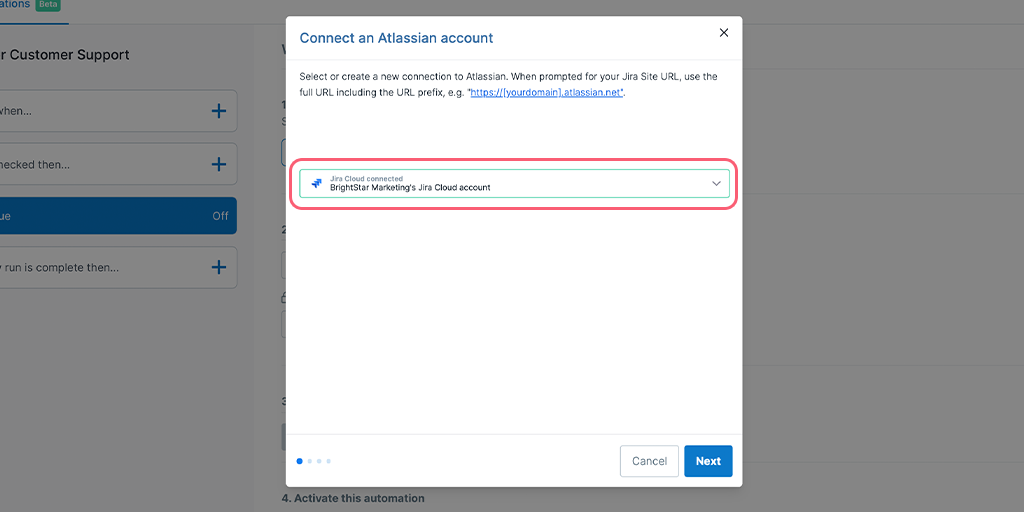
When you select your chosen action, a pop-up window will appear and you will be prompted to choose an Atlassian account to run your automation through.
If it’s the first time you are connecting to Jira via Process Street, a pop-up window will appear for you to be able to create a new authentication.
Note: You will need to disable pop-ups blockers to allow you to authorize an app.
When prompted for your Jira Site URL, use the full URL including the URL prefix, e.g. “https://[yourdomain].atlassian.net”.
If you already have an account connected, then you can continue with the one shown, or select another account to add.
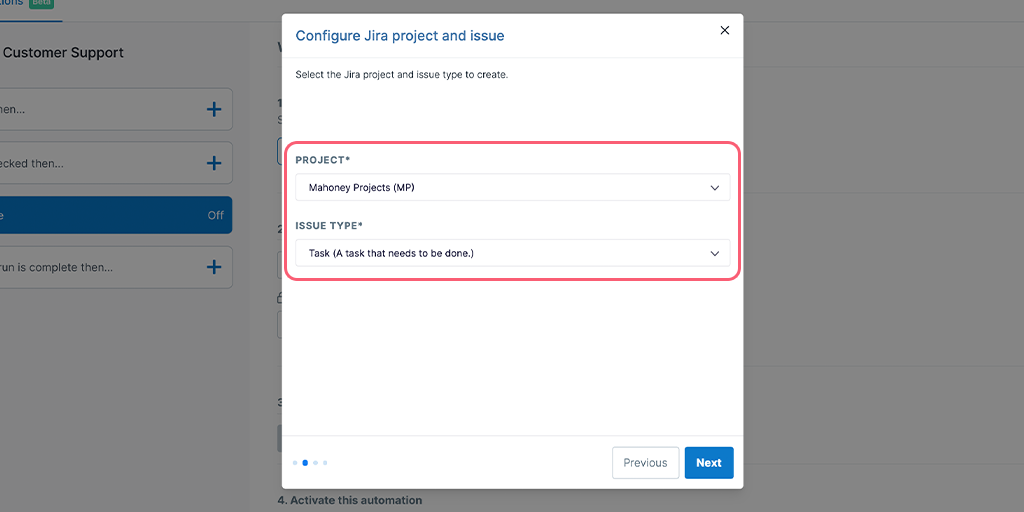
Choose which Jira project to create the issue in, and the issue type you would like to create. Remember the issue type you thought of earlier? This is where you’ll need to add it. Click “Next”.
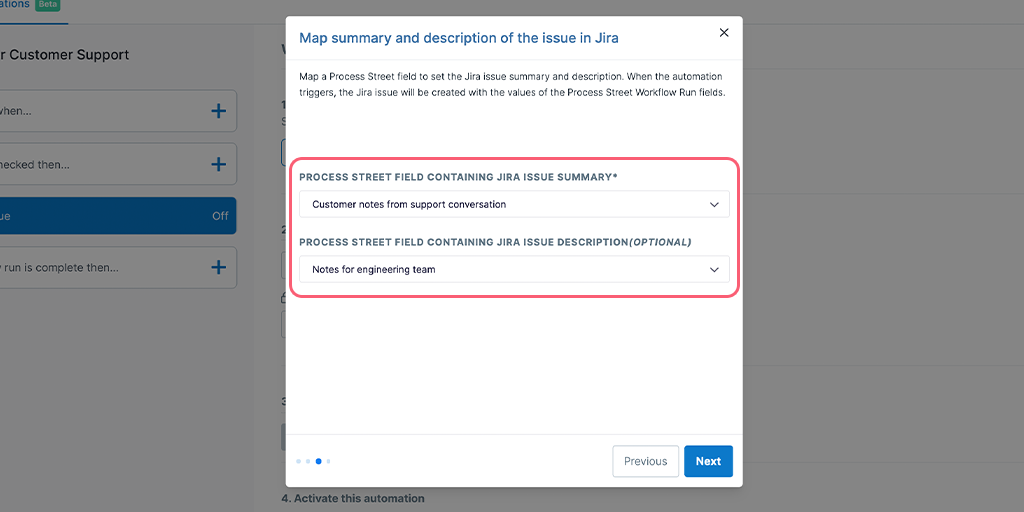
Required: Map the field from your workflow run, that you would like to pull into your Jira issue summary. This will be either a short text or a long text form field that you added to your workflow earlier.
Optional: Map the snippet form field from your workflow run, that you would like to pull into your Jira issue description.
Click “Next”.
This allows you to push data like the Jira ID number or Jira Key, back into your workflow run for future reference.
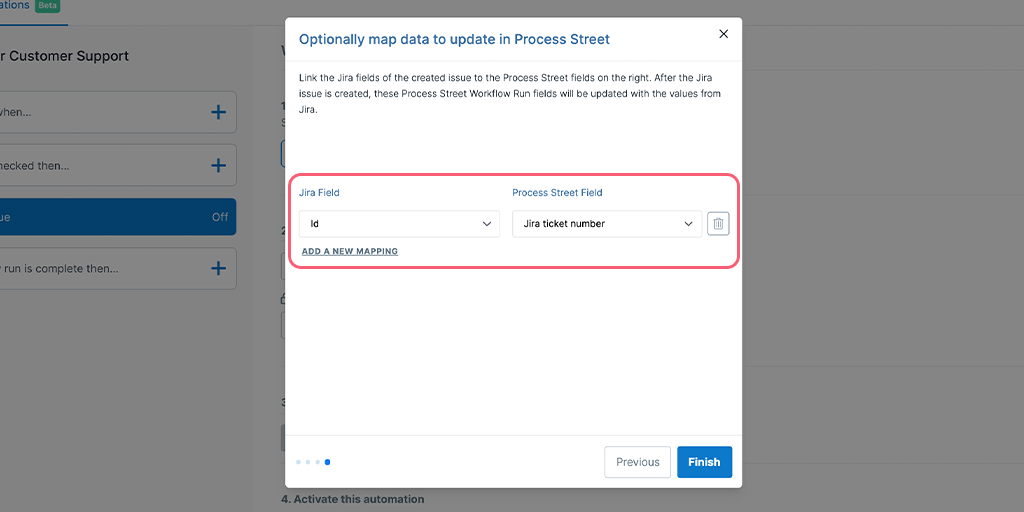
Click “Add new mapping” to map more fields. When you’re done mapping fields, click “Finish”.
Now you’re ready to turn on your automation. Use one of the toggle switches shown below, to switch it on.
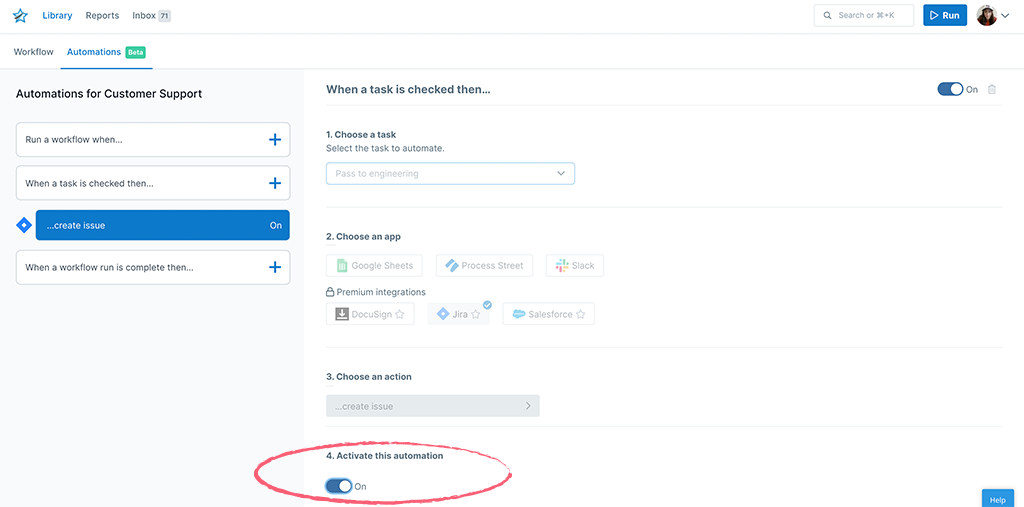
Now every time your task is checked, an issue will be created in Jira, pre-filled with the data you have mapped from your Process Street workflow run. Your Jira ticket or ID number will also be mapped back into the same workflow run.
Select “When a workflow run is complete then” from the left side of your screen.
Next, click the Jira icon and a small tick will appear to confirm your selection.
Select the action “create issue”
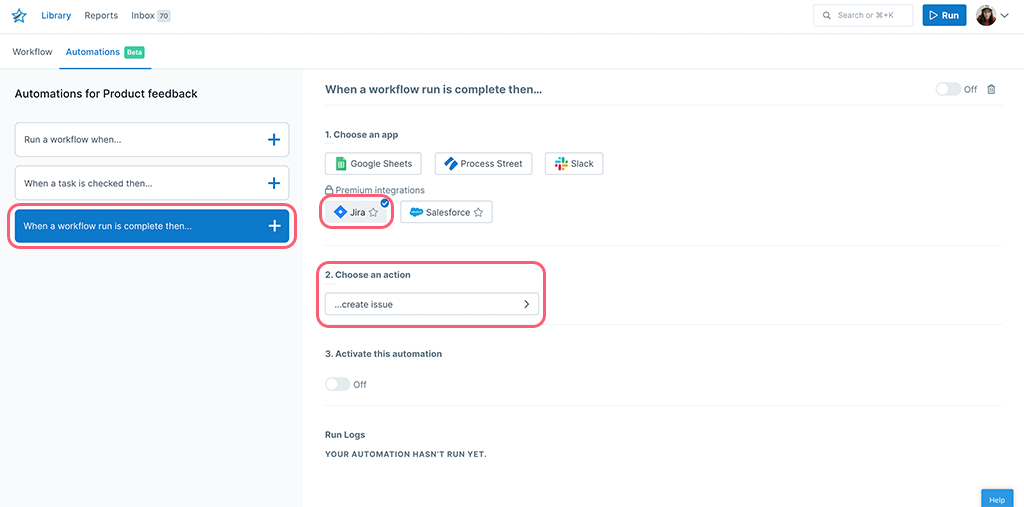
Putting all this together, in this example, completing a workflow run from your “Product feedback” process creates a task for the product department, who triage, prioritize and assign it to one of their team.
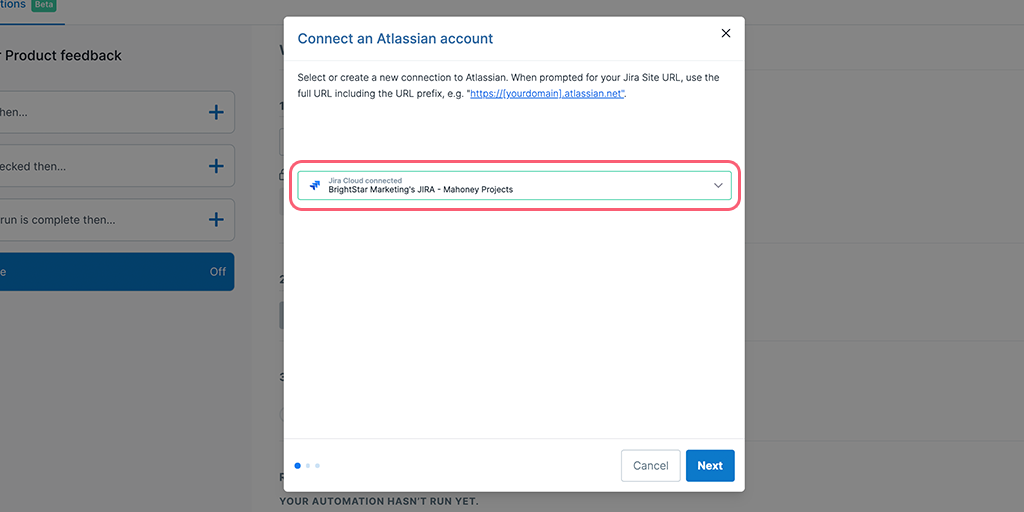
When you select your chosen action, a pop-up window will appear and you will be prompted to choose an Atlassian account to run your automation through.
If it’s the first time you are connecting to Jira via Process Street, a pop-up window will appear for you to be able to create a new authentication.
Note: You will need to disable pop-ups blockers to allow you to authorize an app.
When prompted for your Jira Site URL, use the full URL including the URL prefix, e.g. “https://[yourdomain].atlassian.net”.
If you already have an account connected, then you can continue with the one shown, or select another account to add. Click “Next”.
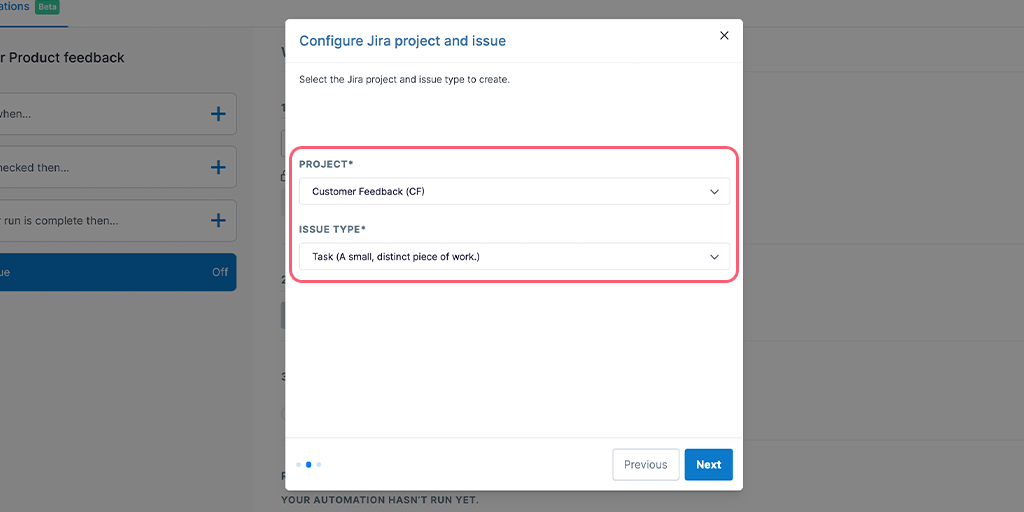
Choose which Jira project to create the issue in, and the issue type you would like to create. Remember the issue type you thought of earlier? This is where you’ll need to add it. Click “Next”.
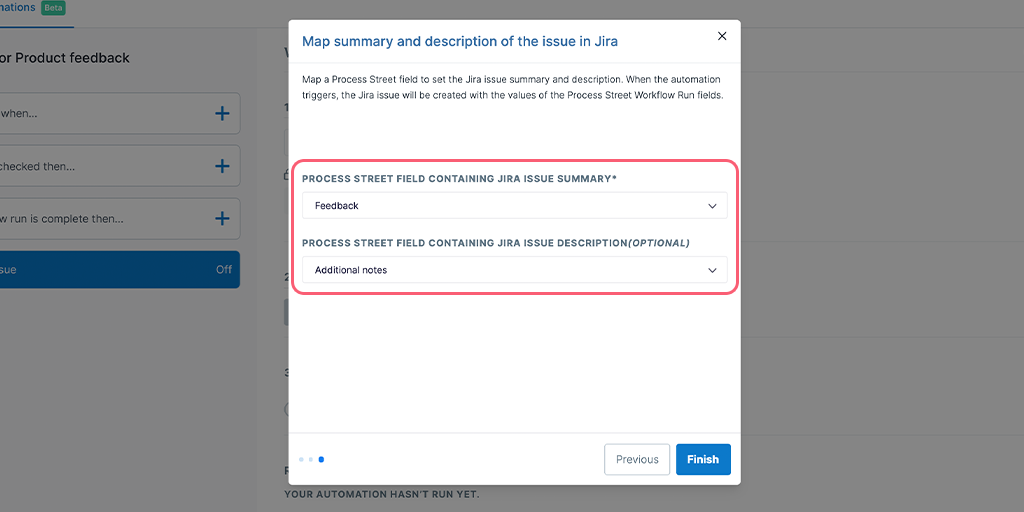
Required: Map the field from your workflow run, that you would like to pull into your Jira issue summary. This will be either a short text or a long text form field that you added to your workflow earlier.
Optional: Map the snippet form field from your workflow run, that you would like to pull into your Jira issue description.
Click “Finish”.
Now you’re ready to turn on your automation. Use one of the toggle switches shown below, to switch it on.
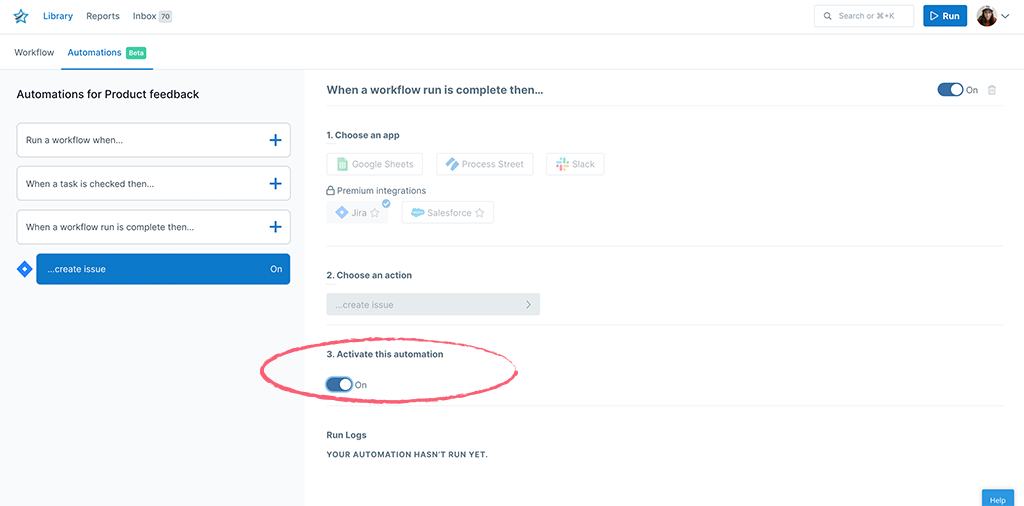
Now every time you complete a workflow run from this workflow, an issue will be created in Jira in your chosen project, including a summary (and optional description) mapped across from your Process Street workflow run.
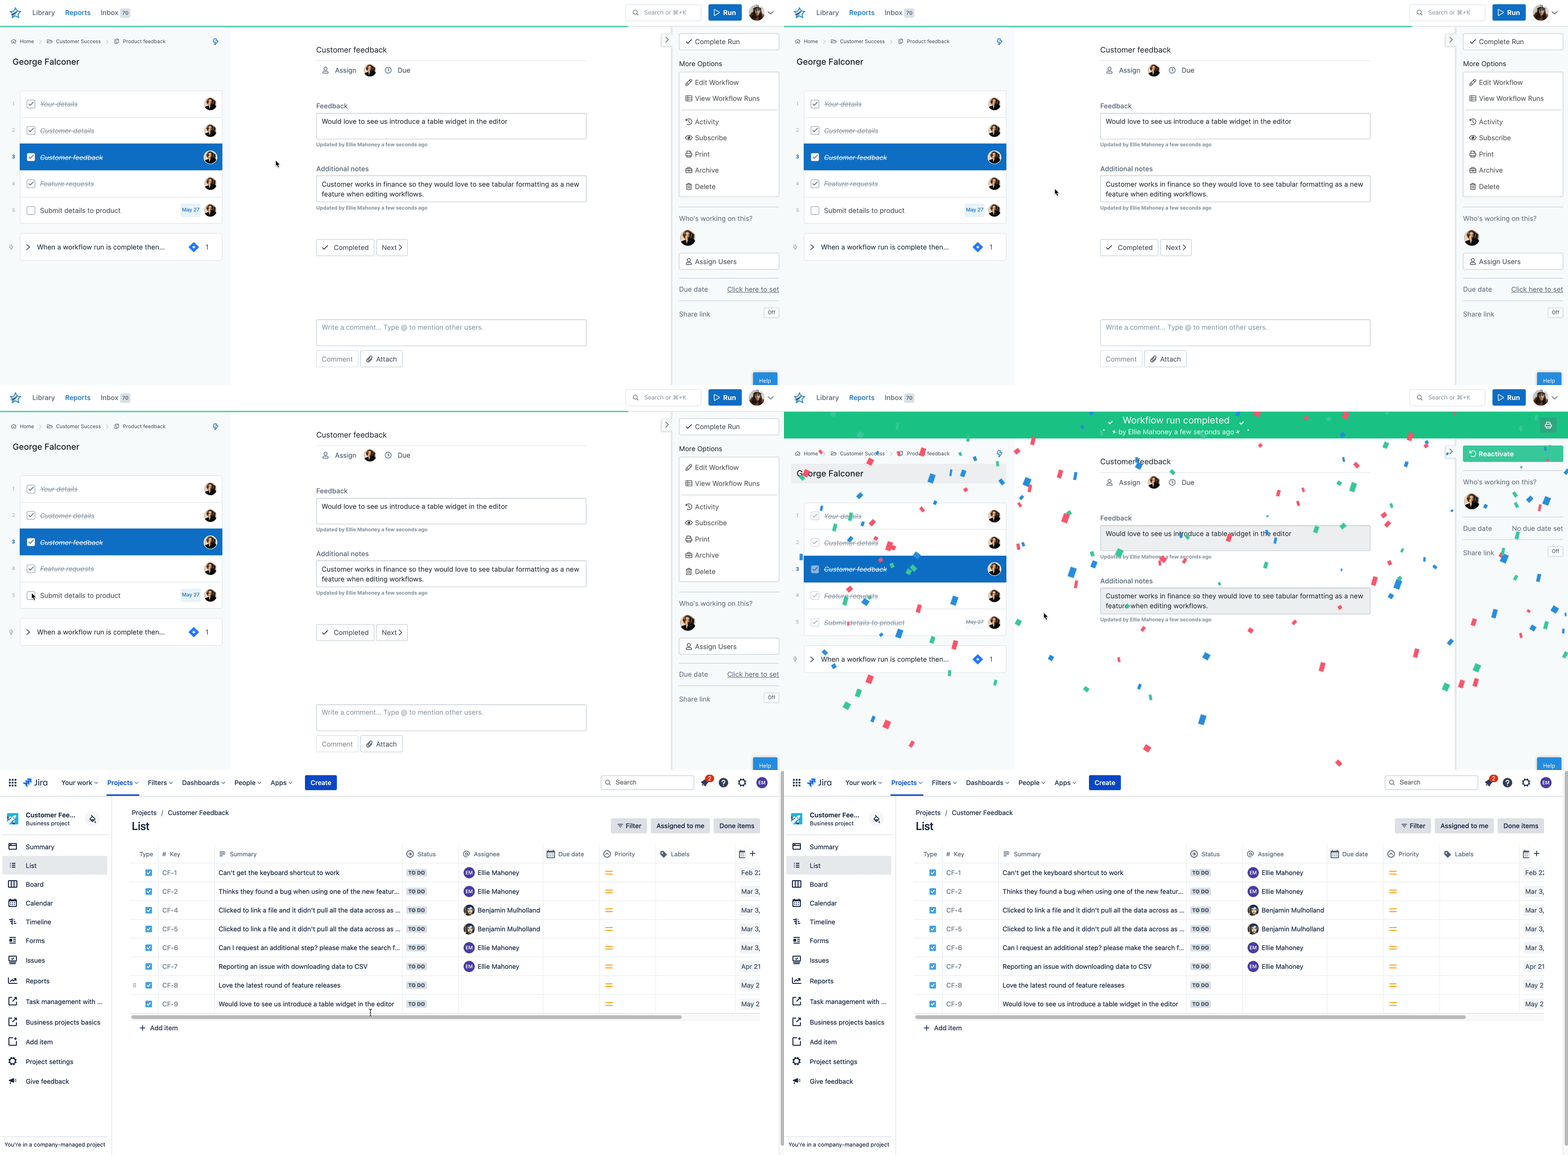
If you’re looking to create a really robust integration with Jira, you can use a workflow run link that you create inside Salesforce’s custom links for each of your accounts. You run your workflow run, create an issue in Jira and then a Slack automation notifies your customer success team in their channel that a new issue has been created.
To be able to edit the fields you have mapped in your automation, or change the triggers or actions, you first need to turn off your automation using one of the toggle switches.
To remove an automation from a workflow, you can delete it, but first, you will need to ensure that it has been switched off. Turn the toggle switch to the “off” position and then click the trashcan icon in the top right of your view to delete the automation.
There are no filters, delays, or formulas built into automations at the moment. To be able to utilize these types of functions, you might want to consider using a Zapier integration instead.
If you would like to request that we add another app to our automations, you can do that from the help button in the bottom right corner of your screen. Click “Suggestions” and send us your request.
If your automation stopped running, isn’t working as expected, or is showing errors, there might be a few reasons for this. Please check the following:
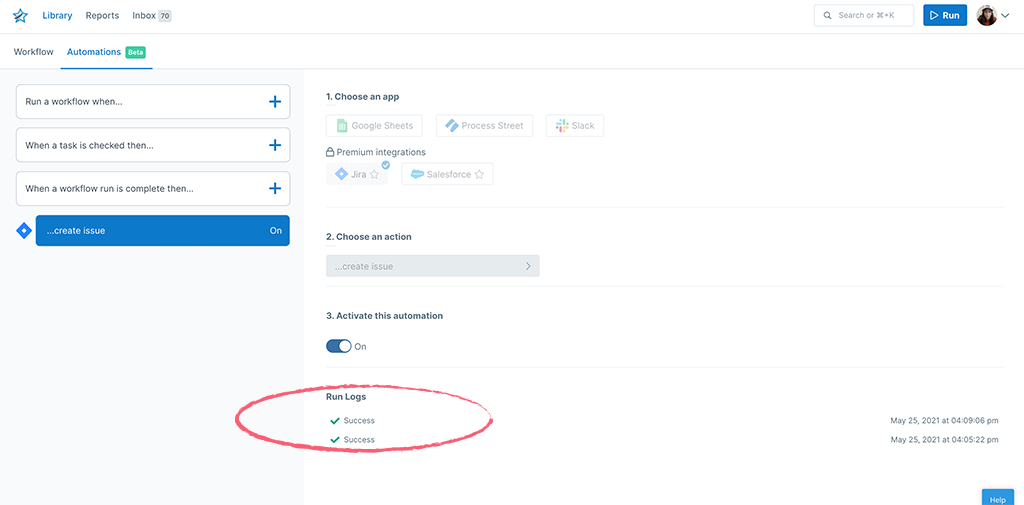
You can check your automation run logs to see how your automations are running, or check for errors. You will find the automation run logs in two places, on your workflow or on workflow runs.
In your workflow on the automations tab, select an existing automation from the left side of your screen (highlighted in blue below). At the bottom of your page, you will see a list of all of the automation runs for that workflow. If your automation hasn’t run yet, you’ll see something similar to the below.
In a workflow run, in the upper right-hand corner of your task list, you’ll see the lightning bolt icon![]() . Click the icon to see the run logs for that particular workflow run.
. Click the icon to see the run logs for that particular workflow run.
If you have any errors, click the word “Error” to expand more information on why your automation didn’t run.
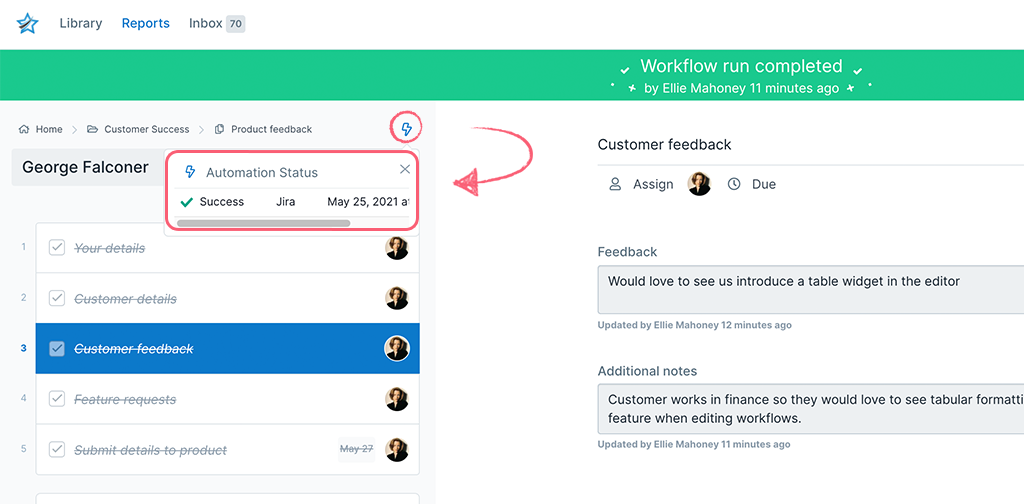
The lightning bolt icon will only show up on workflow runs that have automations configured on them. This is an automation’s idle state.
When an automation is running, you’ll see the bolt change to the ![]() icon.
icon.
Once the automation finishes running, you’ll see either ![]() for success or
for success or ![]() for failure. If it’s a failure, you can click on the X to see the run logs and then click on the “Error” log for more information.
for failure. If it’s a failure, you can click on the X to see the run logs and then click on the “Error” log for more information.
If you have any questions about using Automations, please reach out to our Process Pros team.